Traditional method of passage planning on paper chart:

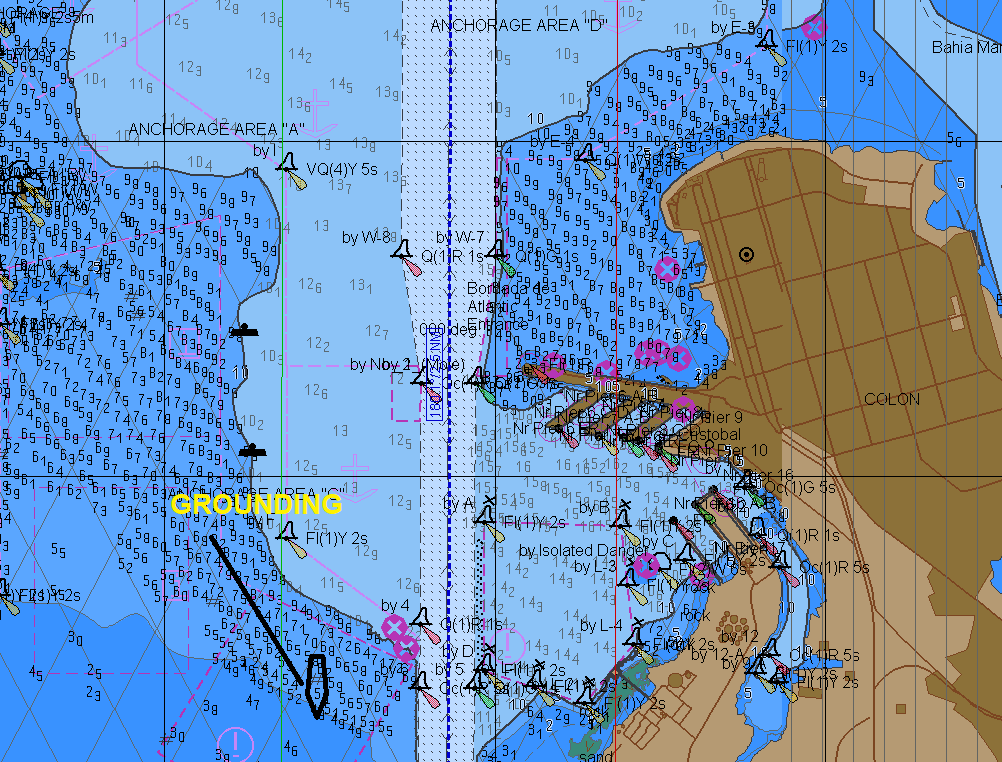
Using a draft of 14 mtr and applying a 2 mtr safety margin, the second mate would mark off areas with depth 16 mtrs and less, on the navigational chart.
These areas would then be highlighted, using a pencil, as a NO GO area and the passage would be planned keeping well clear of this area.

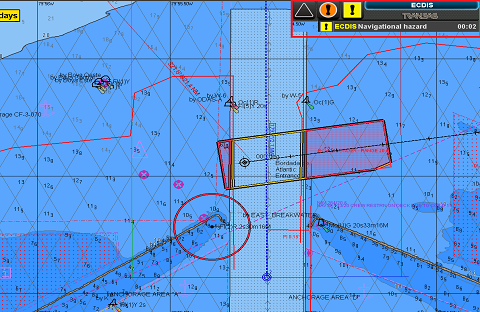
Correspondingly on ECDIS

When the safety contour value is set as 7 mtrs.
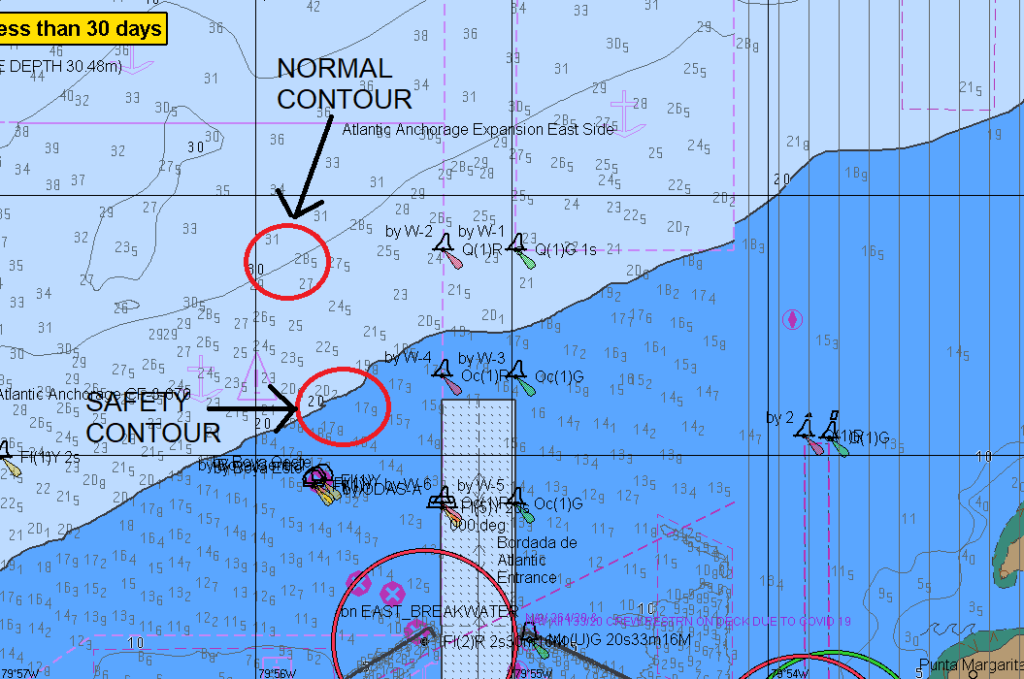
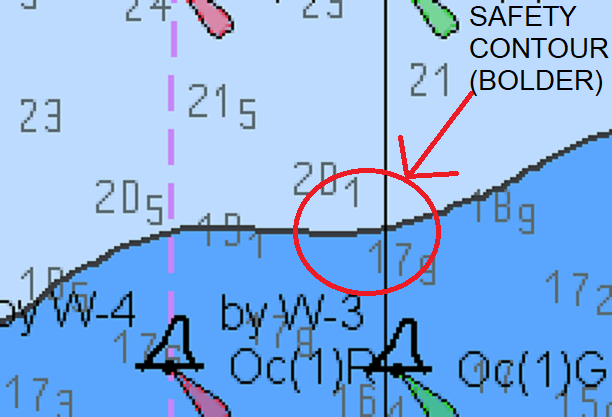
⦁ Safety contour is emphasized (bolder) than other contours.
⦁ If the safety contour specified by the mariner is not in the displayed SENC, the safety contour shown defaults to the next deeper contour.
⦁ ECDIS will give an alarm if, within a specified time set by the mariner, own ship crosses the safety contour.

⦁ Areas with depths lesser than the set safety contour is coloured blue and deeper depth area is coloured white.
⦁ Enabling the “shallow pattern” provides a cross hatch pattern to further emphasis the NO GO area as was done on paper charts.
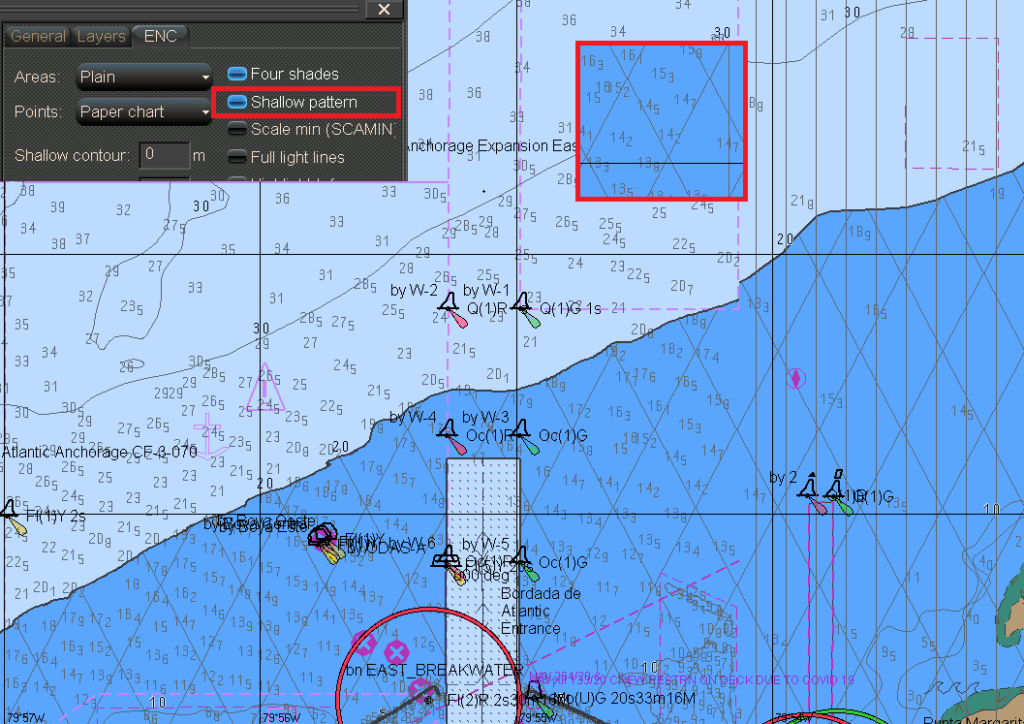
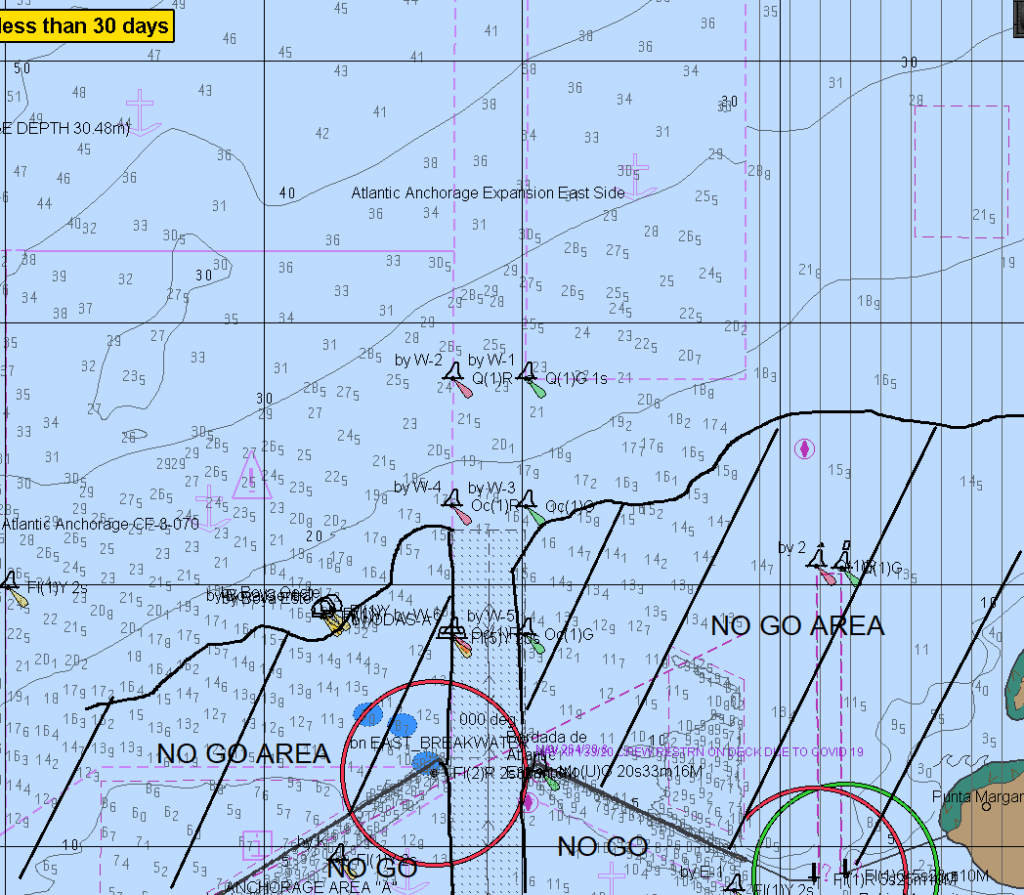
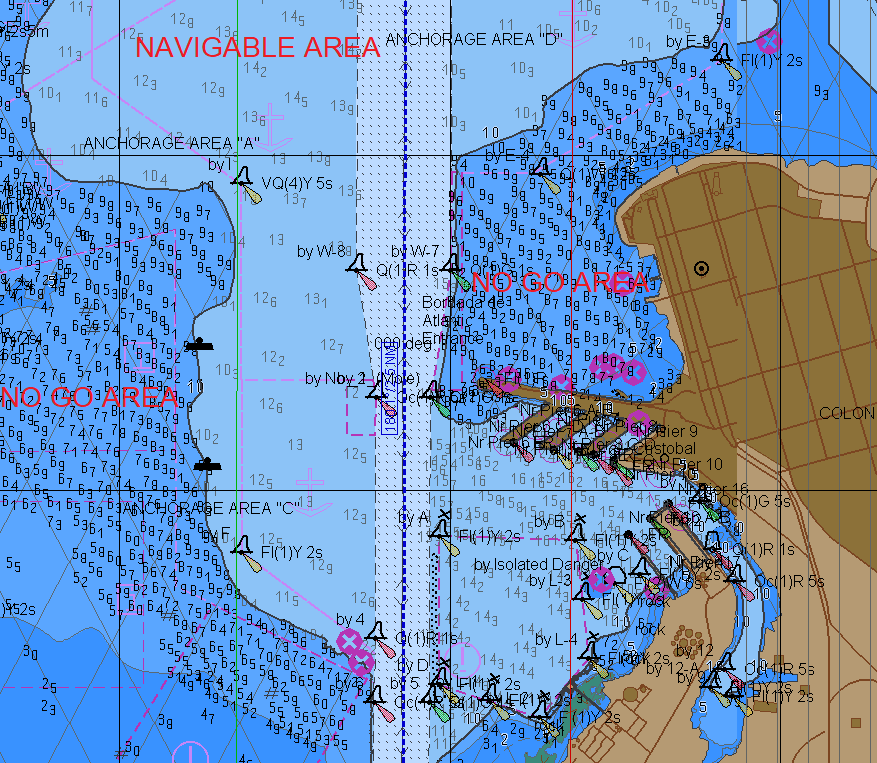
Hence like the traditional NoGo areas on a paper charts, on an ECDIS,
⦁ Blue area denotes NO GO areas
⦁ White area denotes the navigable area.
If the entire planned passage upto the pilot station is through the “white” and the “Grey” areas [without any planned entry into the blues], followed by a channel/river transit to the berth:
Then at no point in the voyage, the vessel’s planned track is expected to cross into the blue areas.
In this case
⦁ By setting safety contour setting

⦁ And enabling the shallow contour pattern,
The No Go area is automatically marked by the ECDIS. There is, generally, no need to additionally mark NoGo areas using mariner info overlay.
What should the OOW do an obtaining a safety contour alarm?
OOW should call the master immediately and alter course back into grey/white zone if you are about to violate the NO-Go area.
By just feeding in the safety contour setting, the ECDIS ENC display is sub-divided into blue (no-go) and white (navigable) zones.
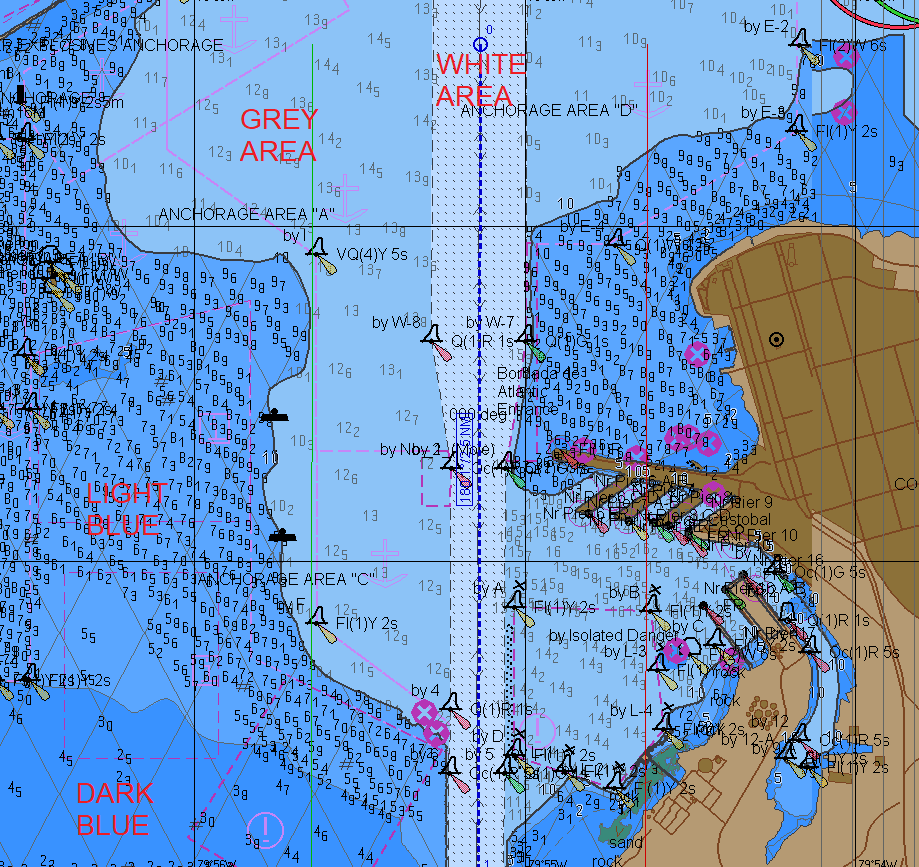
Changing over from 2 color mode to 4 color mode and by entering appropriate values for shallow contour setting and deep contour setting, we find that:
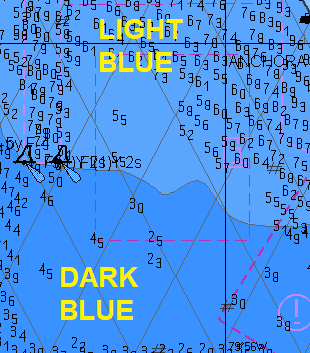
⦁ The blue area gets subdivided into dark blue and light blue areas.
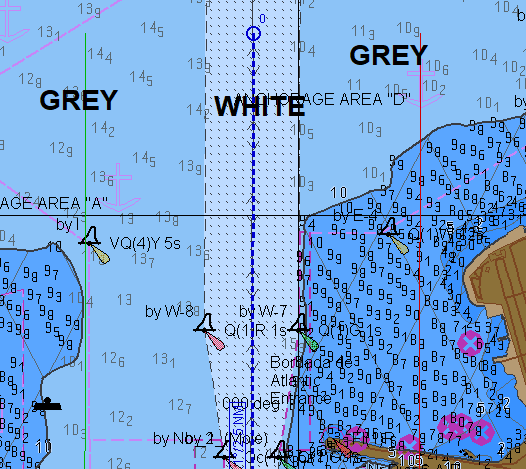
⦁ The white area gets subdivided into grey and white.
What does the colour indicates
DARK BLUE ZONE:
On inputting the shallow contour setting, areas on the ENC with depth value <= Shallow contour setting is displayed as dark blue zone.
Example:-
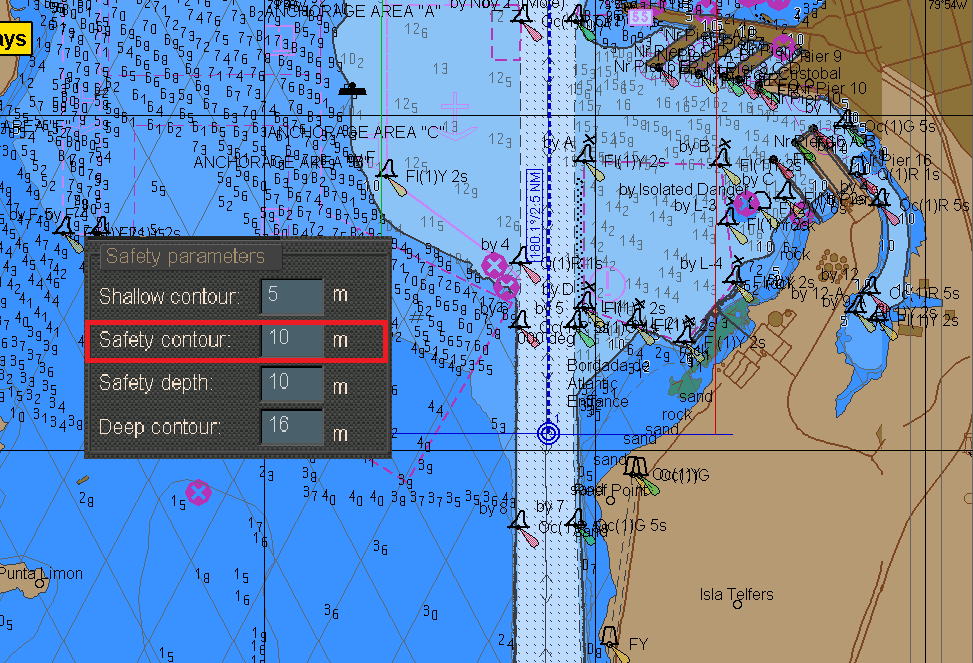
Assuming vessel static draft of 7.80 mtr
With shallow contour setting at 5.00 mtrs

Dark blue zone denotes grounding depths.
LIGHT BLUE ZONE:
On inputting the safety contour setting, areas of the ENC with depth value lesser<= Safety contour setting is displayed as light blue zone.
Example:-
Safety contour setting = (Static draft + all allowances + Minimum net UKC requirement for that area – Height of tide)

Vessel is in congested waters , Height of tide as 1.5 mtrs, we take 0.50 mtrs as the minimum net UKC requirement.
Giving us
Safety contour setting = 7.8+3.0+0.5-1.3 = 10.0 meters
With safety contour setting at 10.0 mtrs
Light blue zone denotes an area where you are in non-compliance with the Minimum Net UKC policy of the company.

GREY ZONE

On inputting the deep contour setting, areas of the ENC with depth value <= Deep contour setting is displayed as Grey zone.
Grey zone denotes an area of potential shallow water effects
White zone is relatively safe waters
No Go Area :- Dark Blue Zone and Light Blue Zone
IMO “standard” display setting is the minimum ECDIS layers considered essential by IMO for safe navigation.
The “standard” display des not include the sounding layer as the four colours shown on the ECDIS display provide sufficient data for anti-grounding purposes.
Example:-
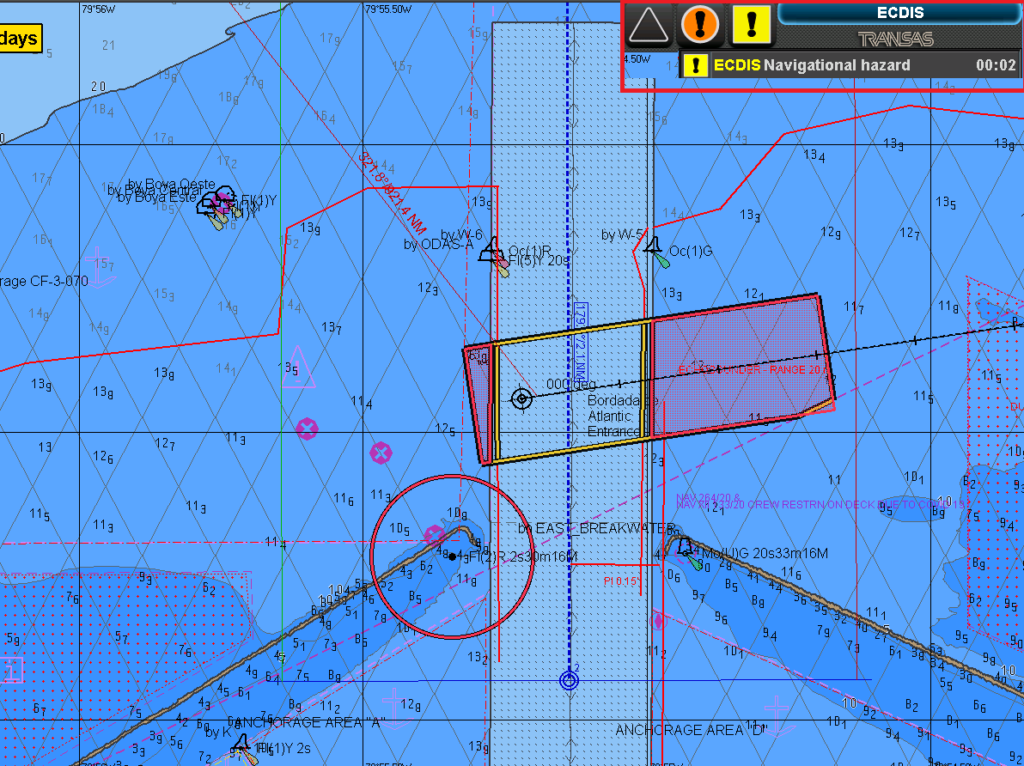
The pilot station is situated within the light blue zone (No go area) of the ENC.
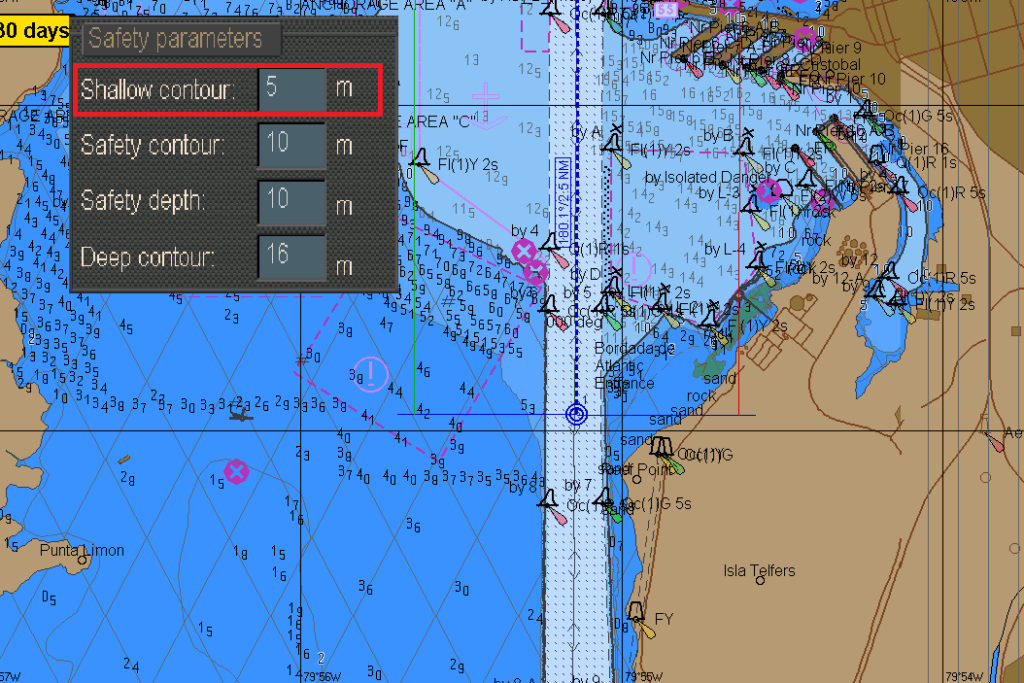
We will use a vessel with draft of 12 mtrs.

Dynamic Draft= 12+1.9 (all allowances ie. Squat, heel correction, density correction and others) = 13.9 m
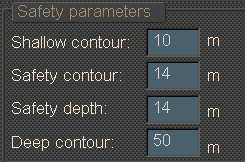
Safety Contour Settings = 13.9+0.5-0.4 = 14.0 m
Safety depth = 14.0 m
Shallow contour = 10.0 m
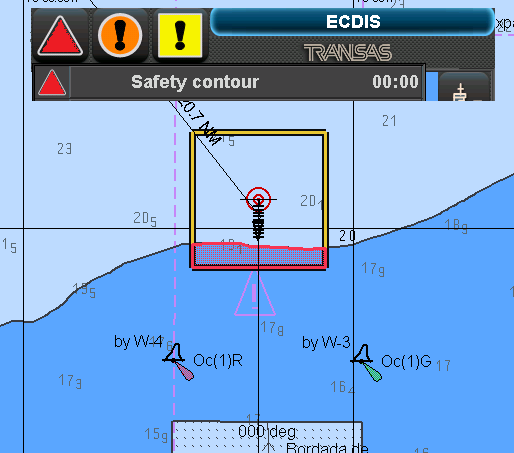
Vessel has to pass the safety contour area to enter channel
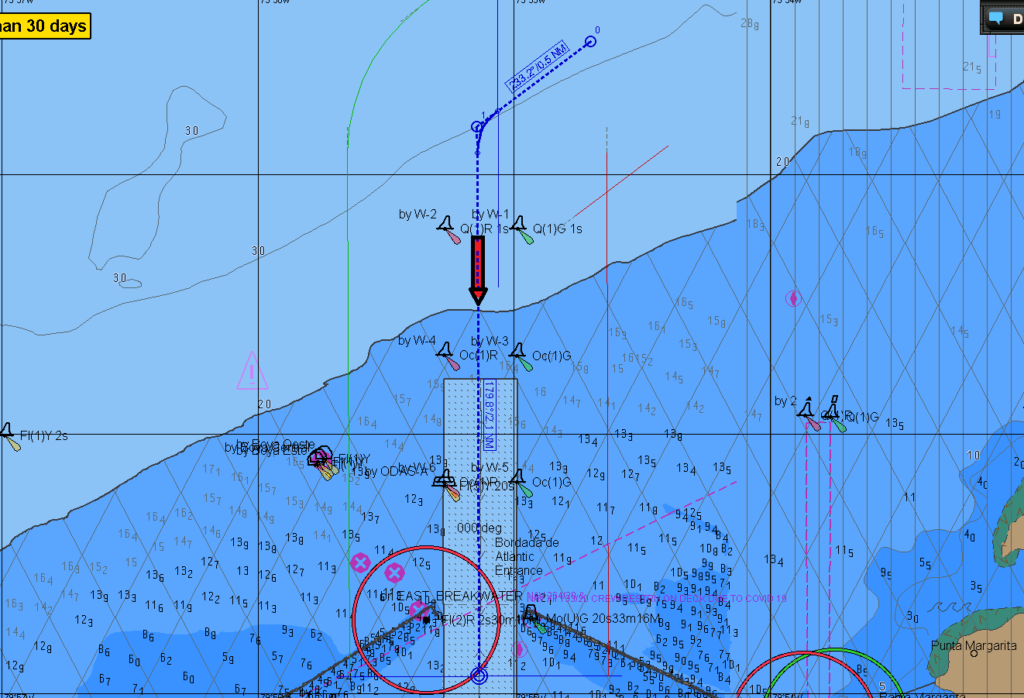
When the vessel first crosses the safety contour, the safety contour alarm will be generated to alert the navigator to a potential violation of the NO GO area.
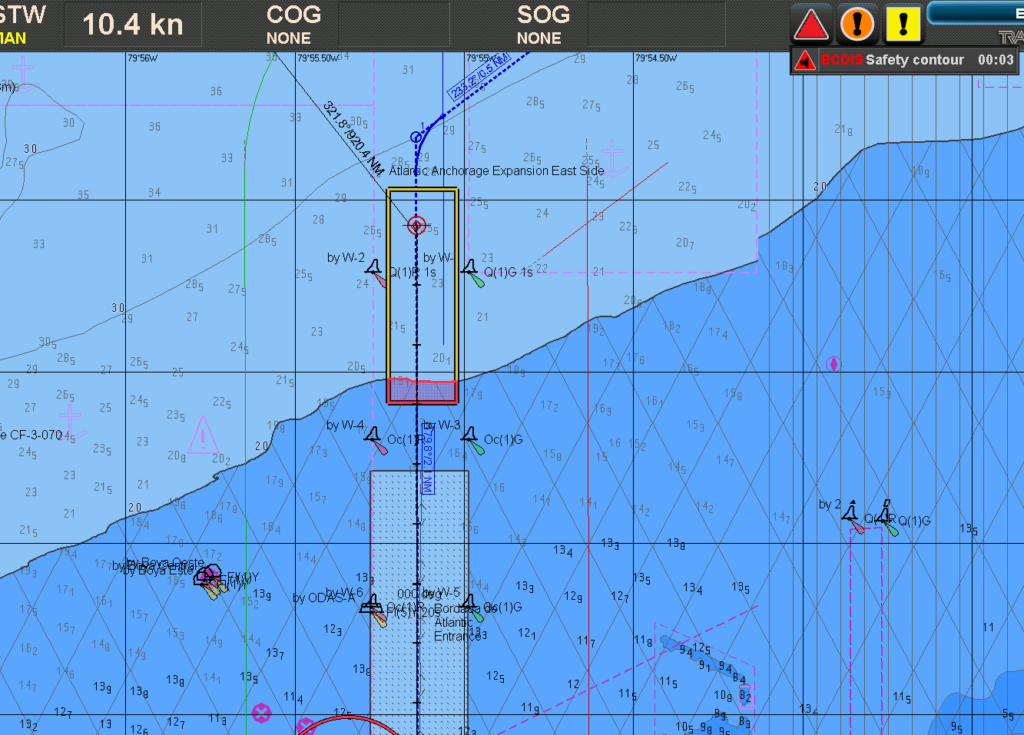
However no further Anti-grounding warnings will be generated, if for any reason, the vessel deviates off her planned route.

Why ECDIS has this issue
The ECDIS ENCs like the earlier paper charts, have sounding contour layers of 5/10/15 or 05/10/20 / 30 or 100/200/300 etc.
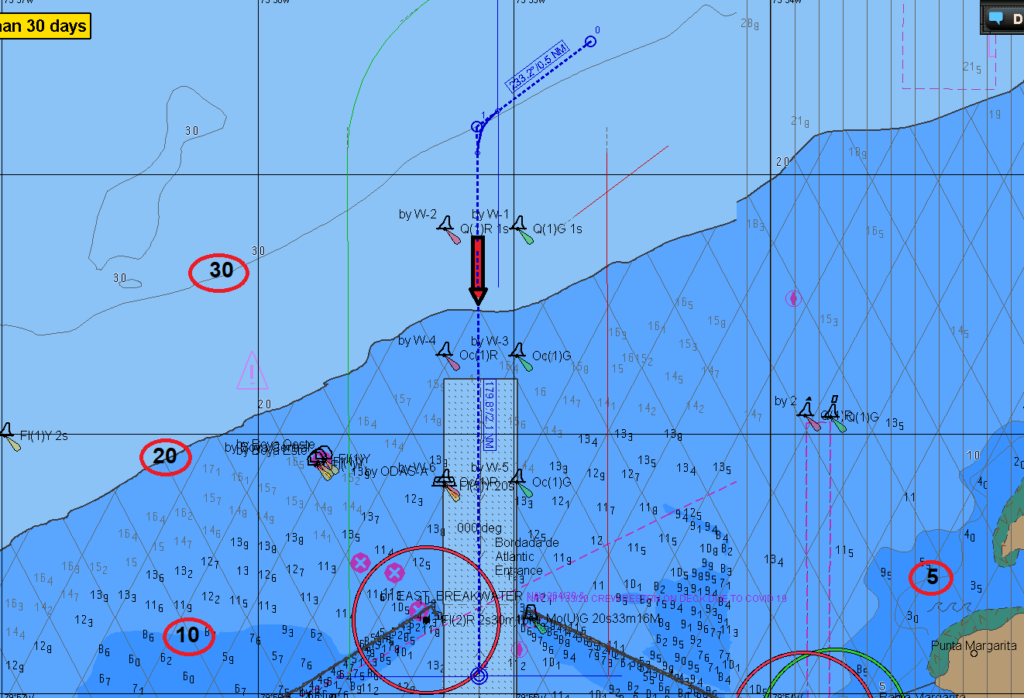
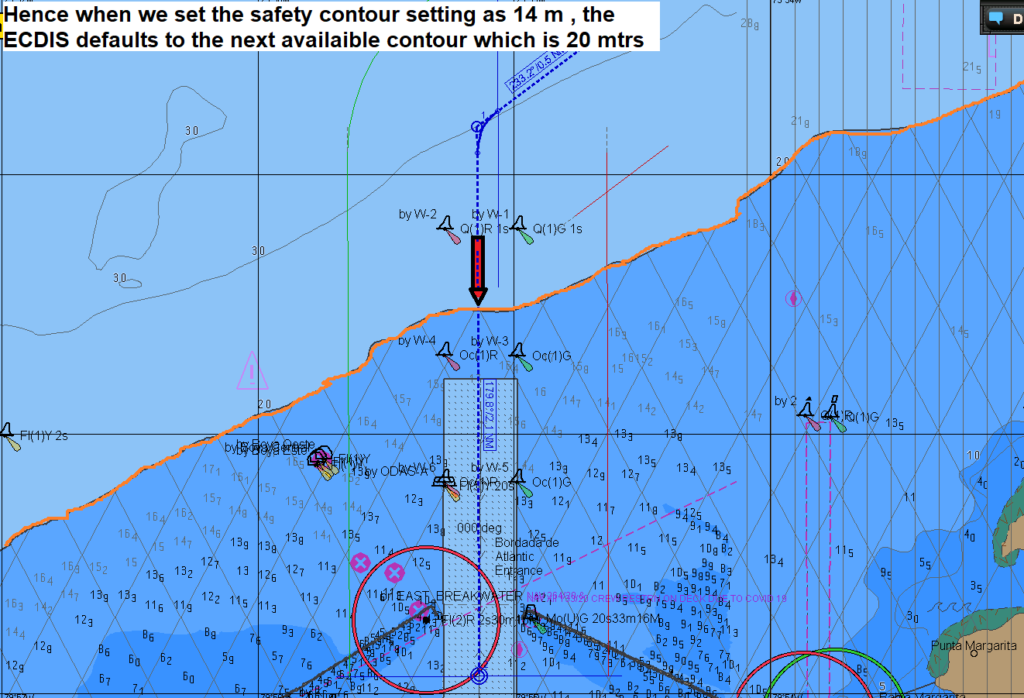
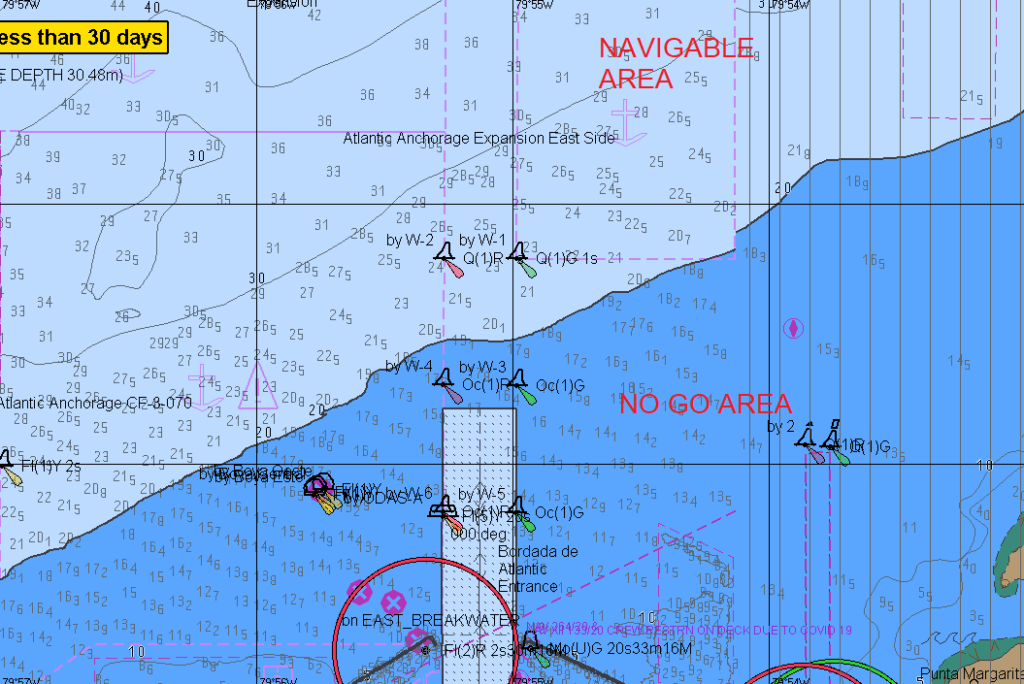
Hence, when we set the safety contour setting as 14 mtrs, the ECDIS defaults to the next available contour which is 20 mtrs.
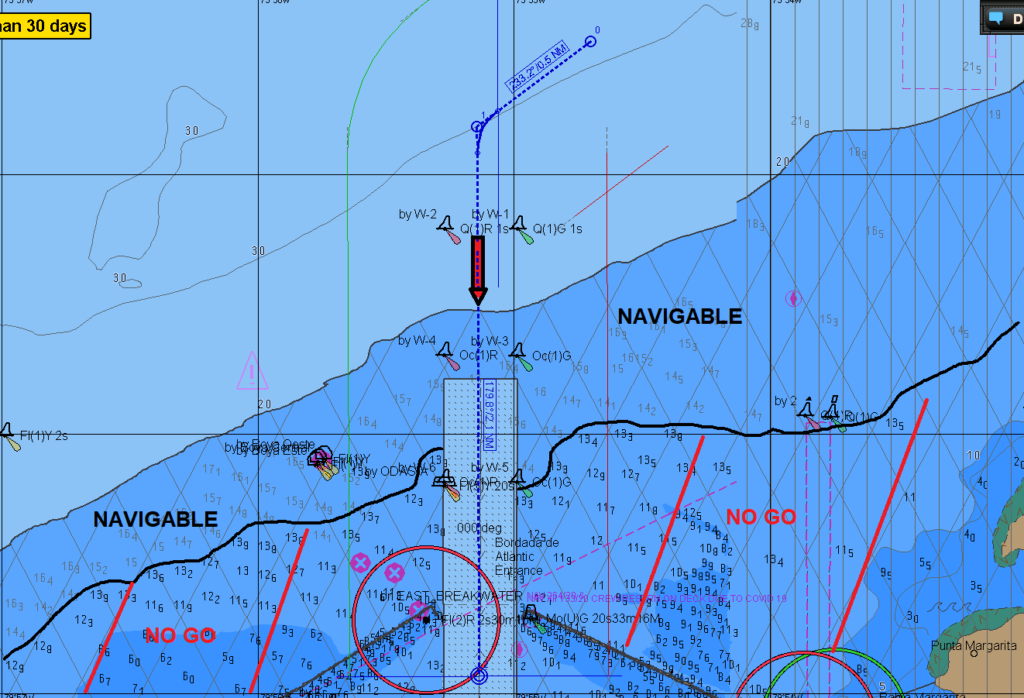
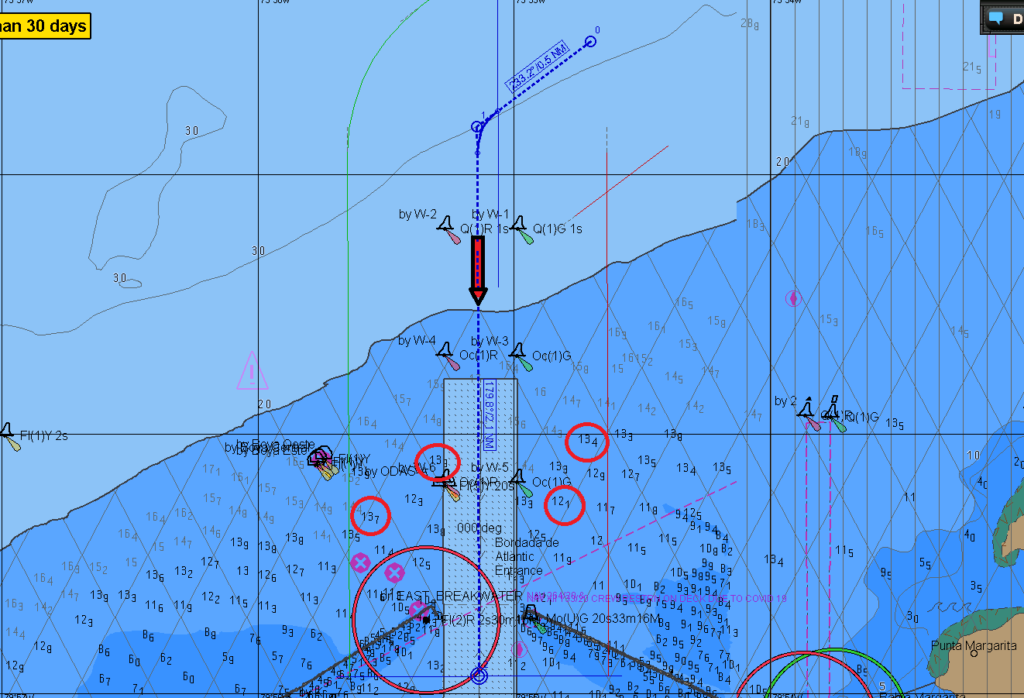
So though the light blue area is a No-GO area as per the ECDIS display, technically we can navigate in waters with depths> the safety contour setting of 14 mtrs (highlighted as NAVIGABLE )
Depths <=14 mtrs (highlighted as NO GO and cross hatched with red lines ) are still No-Go depths as the vessel will likely be violating the UKC policy of the company.
The risk associated with navigation in these safer areas within the light blue zones are:
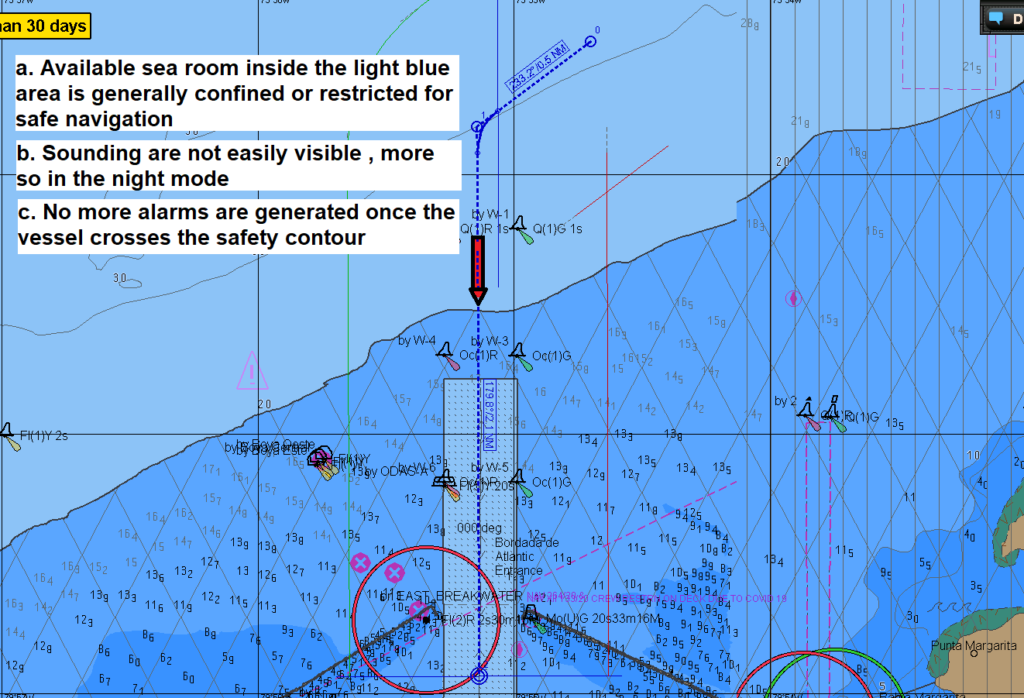
⦁ Availaible sea room inside light blue area is generally confined or restricted for safe navigation
⦁ Soundings are not easily visible, more so in the night mode
⦁ No more alarms are generated once the vessel crosses the safety contour
Configuring the ECDIS for crossing the safety contour
As per above the safety depth setting is set at 14m , so all depths <=14 m will appear bold.
Spot soundings with depth <= safety depth will appear bold.
Note
These are not required to generate any alarms as per the IMO performance standards
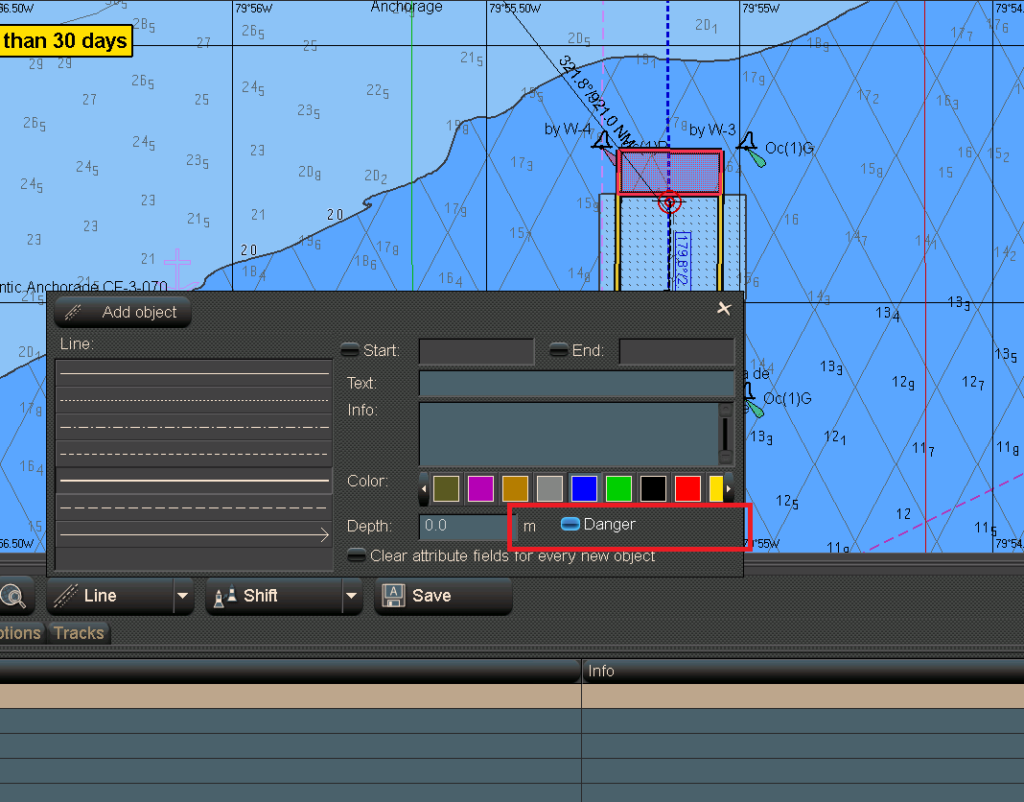
Lets make some modification on ECDIS for more safe passage planning
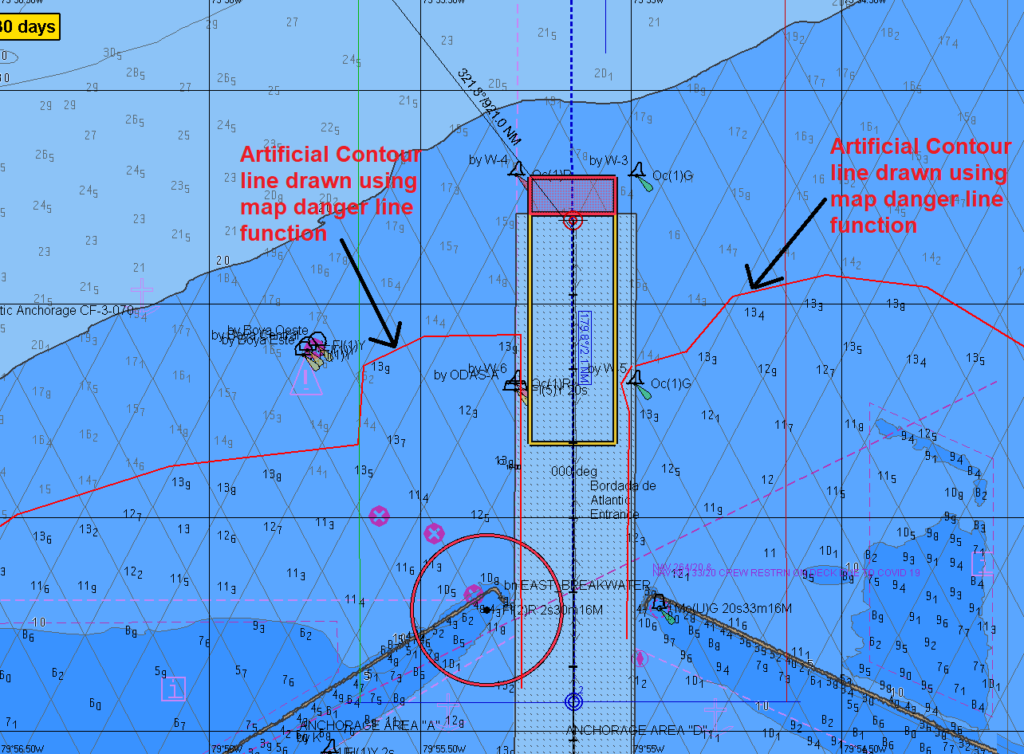
Using user maps (mariner info overlays), demark the no-go areas within the light blue zone. (only usermap lines with danger attribute will generate alarms when interrogated by the safety cone)
Use warning lines to follow the virtual 14 mtrs (safety depth setting) contour indicated by the darker safety depths.
Note:
These warning lines will generate an alarm when interrogated by the vessel’s look ahead (danger detection) cone
Navigate within the light blue zone with the vessel look ahead (danger detection) cone activate.
(Ensure that look ahead cone time or distance setting is carefully set to meet the particular circumstances.
Note:
If set too long it will create numerous alerts that may distract the navigator.
Obstructions (dangerous to navigation)
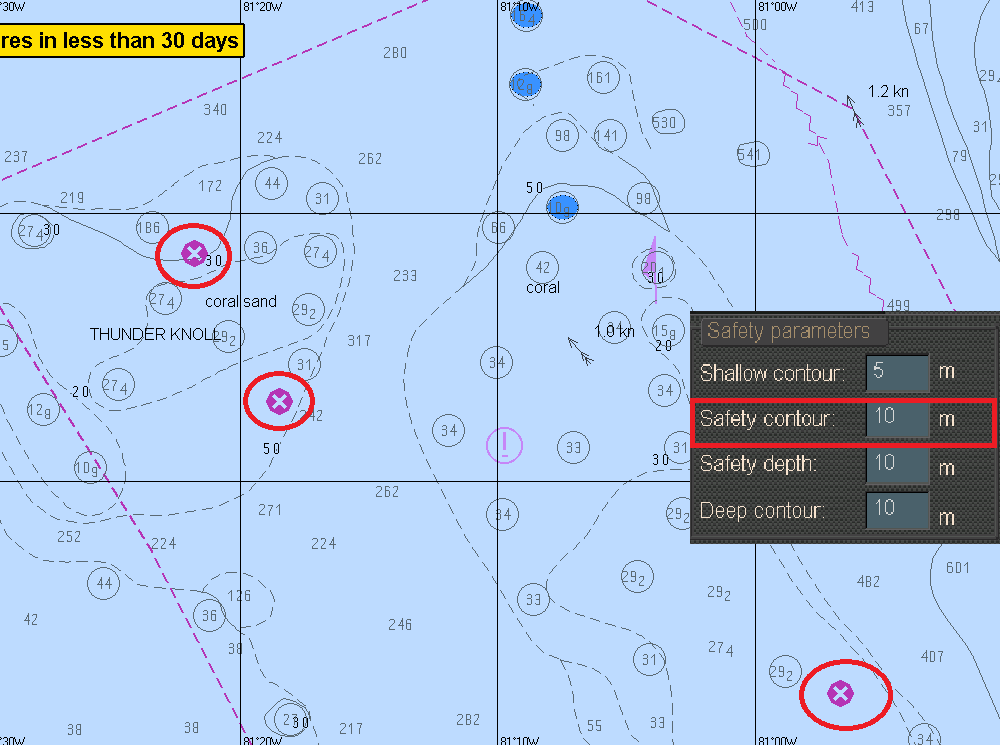
All obstructions (dangerous to navigation) with an attribute equal to or lesser than the safety contour setting will be highlighted with a Magenta Cross Head Symbol.
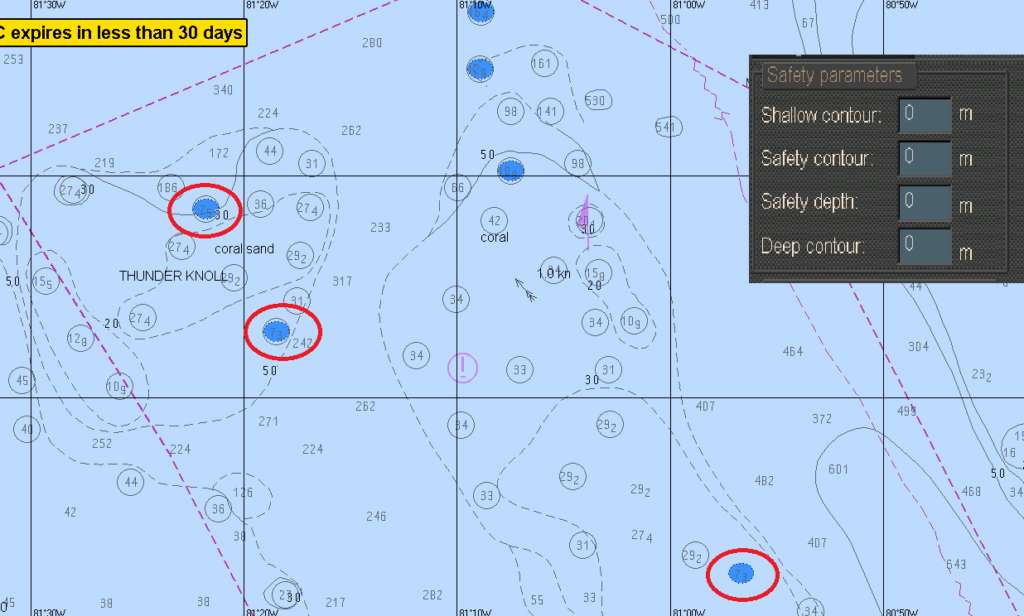
Any obstructions (dangerous to navigation) with an attribute more than the safety contour setting will not be highlighted with a Magenta cross head symbol.