When in port the ship either anchors or moors to facilitate loading and discharging operations. Each of these operations requires skills and detailed knowledge of the capability of the ship and local conditions. A pilot may provide some of these but there are some ports where the master may be required to berth his ship with only a skeletal assistance from shore.
Objective
- Understand and demonstrate the use of berthing equipment, machinery and gear.
- Learn, understand and demonstrate the principles of mooring arrangements normally taken into account when a ship is alongside a jetty.
- Demonstrate the use of rope and chain stoppers.
- Demonstrate the use of heaving lines and gantlines.
- Learn, understand and demonstrate a mooring operation.
Principles of mooring a ship alongside a Jetty
The figure shows a ship moored (made fast) alongside a wharf. The moorings in the figure are named as follows:
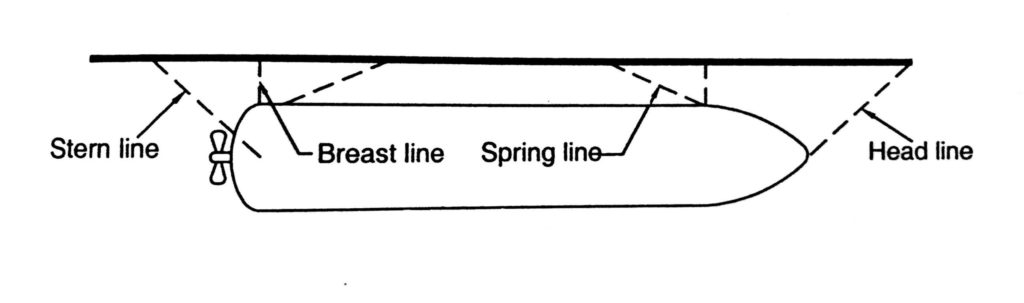
| Head Lines | There may be two, three or even four ropes or wires. The should lead at least 45 degree on the bow |
| Forward Breast Rope | A rope/wire, which leads as near 90 Degrees to the ship’s fore and aft line as possible. |
| Forward /Aft Spring Line | It is usually a wire rope passed from the shoulder pipe and leads well aft/ forward. |
| Stern Lines | Two, three or four ropes and wires leading about 45 degree on the quarter. |
| After Breast Rope | A rope/wire, which leads as near 90 degrees to the ship’s fore and aft line as possible. |
| After back Spring | It is usually a wire rope passed from the waist pipe and leads well forward. |
It will therefore be obvious that the head lines, stern lines and the fore and aft springs prevent the ship’s movement in the fore and aft direction. The breast ropes and to a certain extent the forward and stern lines prevent such movement in the athwartship direction.
After the ship is made fast or moored, the moorings need to be tended regularly to allow for: –
- Changes in the force and direction of the wind or current;
- Changes in the ship’s draft;
- Rise and fall of the tide.
“Remember the security of the ship alongside is as important as safe watchkeeping at sea. It needs personal attention of the deck watch throughout the time the ship is alongside. This demands good knowledge of the ship’s equipment and the principles of good mooring. The attention to mooring should be a planned activity.”
Note this
Jse of rope and chain stoppers
low to pass rope stoppers: .
Use of Rope or Chain Stoppers
These are lengths of rope or chain secured to bitts to facilitate taking the mooring rope or wire from the drum and placing it on the bitts.
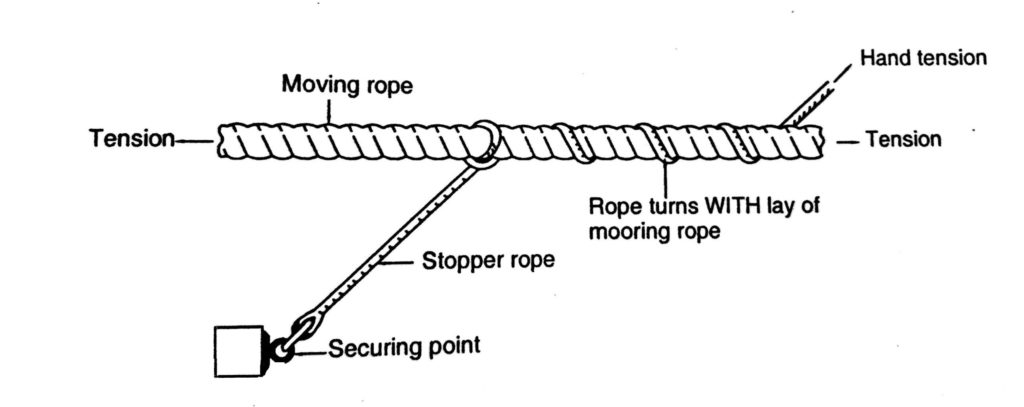
How to Pass Rope Stoppers
- First, secure one end of the stopper as near the bits as possible. This is done by reaving one end of the stopper through the eye at the other end, and slipping the bight thus formed over the bits.
- Now lay the stopper over the mooring hawser or wire and watch carefully. whether the stopper lies with the lay or against the lay. So, if the stopper with the lay, remove it and take it under the mooring hawser. This will now be against the lay
- It will be found that if the stopper is made fast to the right of the hawser when looking along the outward going part of the hawser, the stopper knot has to be started from top. Conversely, if the stopper is made fast to the left of the rope, the knot has to be started from below.
- Take a half hitch.
- Take another riding turn as for a rolling hitch, back up the stopper rope as shown in fig and take a number of turns round the mooring rope, with the lay. Now catch the end of stopper and pull it away from the bits at an angle of about 30° with the mooring hawser. Sometimes the riding turn is omitted, if the strain is not too much.
Chain Stopper
It consists of a length of about 7-mm diameter open link chain, about 1 .5 metres long. One end of this chain has a wide link, while at the other end is spliced (by chain splice) a length of about 1.5 metres of small rope (10-mm diameter). A chain stopper should never be used for vegetable or synthetic fibre ropes, as it will cut them.
How to Pass Chain Stopper
Take another half hitch about 45 cms away from the first half hitch in such a Way that if the two half hitches were close together they will form a cow hitch and not a Clove Hitch. Now back up the chain and take turns around the wire against the lay of the wire. When sufficient turns are taken, catch the stopper end and pull away from the bits at 30-degree angle with the wire.
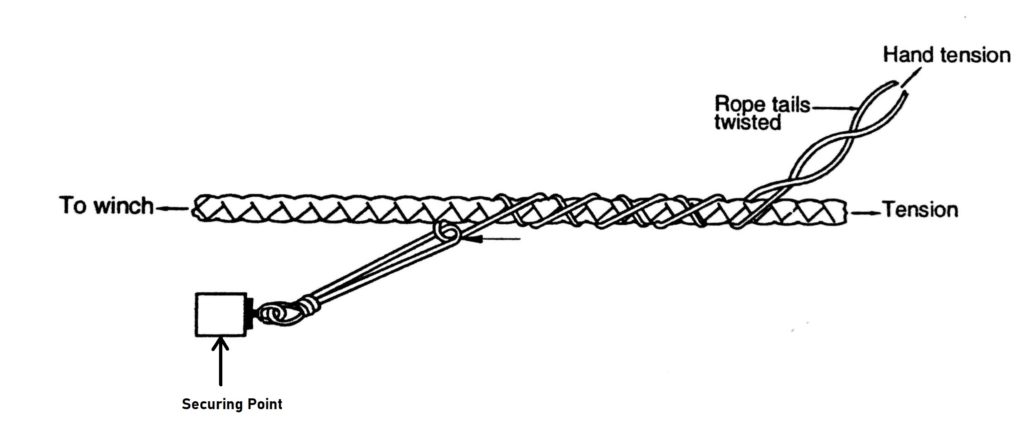
West Country Stopper
West Country stopper is a synthetic fibre rope (other than nylon) of about 25-rnm diameter and five to six metres long. Both ends are whipped. It is used for stopping synthetic fibre hawsers. The stopper is folded in two equal halves and the bight put around the bits. The two parts of the stopper are crossed alternatively Over and under the hawser a number of times. Finally, the two ends of the stopper are pulled away from the bits.
Securing Rope on Bitts
At least three ‘figures of eight’ turns should be taken. First figure of 8 turn should be taken round the bitts. The next two turns can be ordinary criss-cross turns. Wire ropes when made fast on bits should be lashed.
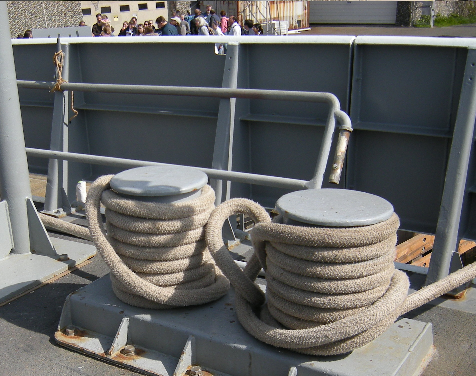
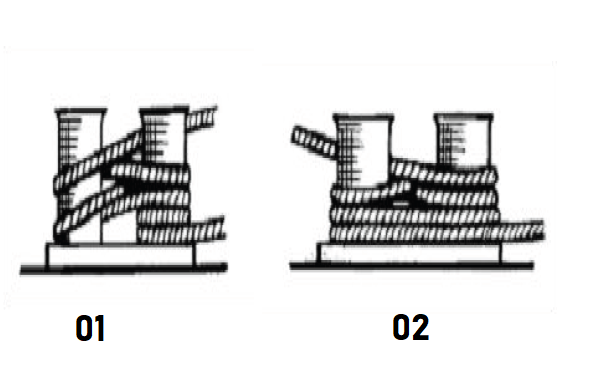
Use the following methods to turn the mooring ropes around the bitts for a safe arrangement:
a) For Large size bitts – take two round turns (but no more) around the leading post of the bitts before applying figure of eight, as illustrated in the below figure 01.
b) For Smaller circumference bitts – take turns around both posts before applying figure of eight, as illustrated in the below figure 02.
Throwing a heaving Line
A heaving line is a light thin rope, about 15 fathoms long. It may be a 6-mm or 8 mm, diameter vegetable fibre rope or a nylon rope. One end of it is weighted by making a monkey fist or a heaving line knot on it and the other end is just whipped. Do not insert any weight in side the monkeys’ fist as it may break somebody’s skull. Only oakum may be stuffed.
A heaving line is used to make contact with the wharf so that mooring hawsers may be passed ashore. To throw the heaving line, tie the whipped end on the rails or on your left wrist, and then coil all the line in your left hand, using small coils. Now transfer 1/3 of the coils including the weighted end in your right hand Swing the heaving line in your right hand like the lasso of the cowboy and at the same time pay off from the left hand. The swing should be at shoulder height and horizontal. Heaving lines can be thrown up to 25 meters distance. it is advantageous to wet line before throwing.
The efficiency of a heaving line thrower lies not only in sending it far but in the speed of recoiling the rope and re-throwing it, if it misses the first time.
Messenger
It is a 16 or 20 mm diameter rope used for bringing on board a heavy hawser With some strain on it when a heaving line is not considered strong enough. If the hawser is under strain it may be able to pull the extra hawser on its own, provided the number of turns on the bits or the drum are not many remove a few turns until the hawser is able to slacken itself. A little manipulation of the remaining turns may be necessary. It may be borne in mind that while slacking from the bits is a comparatively easy operation; slacking from the warping drum presents difficulties, as after sometime the turns tend to get mixed up. It is, therefore, advisable to shift the hawser to bits if prolonged slackening is expected.
Aariya (Indian Crew)
This order means to slack away the rope or hawser.
Check the Rope:
This order is given when the hawser is being slacked away. On hearing this order take one more turn on the bits or on the drum and pull on the inner part of the hawser to check the hawser from running away. Let the hawser become tight but not too tight. Feed a little slack as soon as the hawser gets too tight.
Hold On
Means that the hawser should neither be slacked nor hove up. Carry out this order by taking one more turn on the bits or drum. Of course, don’t break the hawser and if you think that the strain is too much and the hawser may part, inform the bridge and slack just a little.
Make Fast
At this order, make fast the hawser on the bits. If the hawser is on the drum, it shall be transferred to the bits.
This is done as follow: –
Pass a stopper on the hawser ends when ready, slack a little hawser from the drum or walk it back a little to shift the strain gently onto the stopper. When the stopper has taken the strain, quickly remove the hawser from the drum and make it fast on the bits, taking in all the slack. Unhitch the stopper.
Off Turns
It means remove all turns from bitts or drum.
Single Up
It means that all lines should be cast off except the minimum necessary to keep the ship in position. The Master on pilot’s advice orders the minimum necessary. When the ships is to leave berth, stations are called and the crew take in all extra hawsers, so that when the order ” LET GO” is given, there are only one or more ropes to contend with. Generally this order is qualified by stating what lines are to be kept, e.g., “Single up to a line and back spring” or “Single up to a slip wire” etc.
Let Go
At this order “off turns” and slack down the hawser, when the eye of the hawser is removed from the shore bollard heave it in quickly.
However, if the last hawser is to a buoy, do not “OFF TURNS” suddenly. The hawser will have a lot of strain on it. So slack away gradually at first until the hawser stops slackening itself. You will observe that as you slack away the buoy
Sending Away the Headline or Sternline
There are two ways of sending away a line:
a) By mooring boat: Lower your hawser upto about half a metre above the waterline. When the mooring boat gets hold of the end, follow instructions and slack away. However, if you are on the after station never slacks to much. Otherwise, the bight of the hawser will foul the propeller. when the mooring boat has secured the eye of the hawser on the shore bollard (or buoy ring), lead the hawser to the warping drum and pick up the slack.
” When the boat is picking up the stern lines, inform the bridge so that engine movements are not given.”
b By heaving line: If the jetty is not too far off, throw the heaving line and when the shore labour have got hold of the end of your heaving line, haul in the slack. Pull a bight of the heaving line in through the fair lead and tie it to the eye of the hawser. Now wait till the shore labour hauls on the heaving line, slack away on the hawser and on the heaving line until the shore labour gets hold of the hawser. They will then untie the heaving line and put the hawser eye over the bollards. Lead the hawser to the warping drum and pick up the slack.
“Havyes” (Havis) this term is a corruption of “Hoist” and means ‘Heave Away’.
Take three turns of the hawser round the warping drum and pull on the inner part of the hawser just behind the turns. If due to heavy strain the turns slip, take another turn on the drum.
Avast heaving: it means, “Stop heaving”
Surge: Sometimes, it is not convenient to stop the turning of the warping drum, even though it has become necessary to stop heaving the hawser. The hawser is then “Surged” i.e. the number of turns on the drum are reduced and the inner or hauling part of the hawser held still or raised slightly. This enables the hawser to slacken itself in jerks after every few centimetres of heaving and thus it remains stationary, neither heaving nor slacking.
Surging is not good for the hawser as it heats up the hawser due to friction. Synthetic fibre rope should never be surged. (Unless it is a “KEVLAR” rope)
Slack Away: The order “Slack Away means: “Pay out on the hawser so that a longer length is Outside the ship”. -moorings take in the slack. Once slack throw off the turns and slack down the hawser, keep it slacked down while the hawser is being unhitched from the buoy ring. Heave in quickly when the hawser is unhitched.
General Safety Precautions
FOLLOW THESE VERY STRICTLY
- Never stand in a bight of a rope.
- Never stand with the legs on either side of a rope, which is being worked. This mistake is commonly made when passing stoppers.
- When a tug is pulling hard on a towrope, keep in a safe position to avoid being hurt by the whiplash if the towrope parts.
- Never look over the bows by standing over the fairleads. Your foot may be caught between the rope and roller.
- Never put the eye of a slip wire over the bits. Always make it fast by taking turns, so that the end can be easily cast off even if the slip wire is under strain. This principle is also to be followed whenever the tug’s rope is to be made fast on board, unless specifically instructed to put the eye on the bits.
- When a wire rope is to be used, take out the required length of wire and range a good length of wire on the deck. Never use a wire rope directly from the reel. Because if the wire rope fouls, the reel itself may be torn off from the deck. Similar precaution is necessary when passing a line to the tug.
- Always take precautions against the rope or wire taking charge and running out on its own, under its own weight or under the pull of a powered mooring boat. A turn on the bits or a half hitch of the stopper will keep the rope under control.
- Quite often, a back spring is led to a cargo winch for heaving with the aid of lead blocks. These blocks should have a proof load equal to the breaking strength of the wire rope and should be fixed on such positions as to provide correct leads.
- The winch, capstan or windlass should always be under the control of an experienced person. He should never leave the controls to attend to any other work