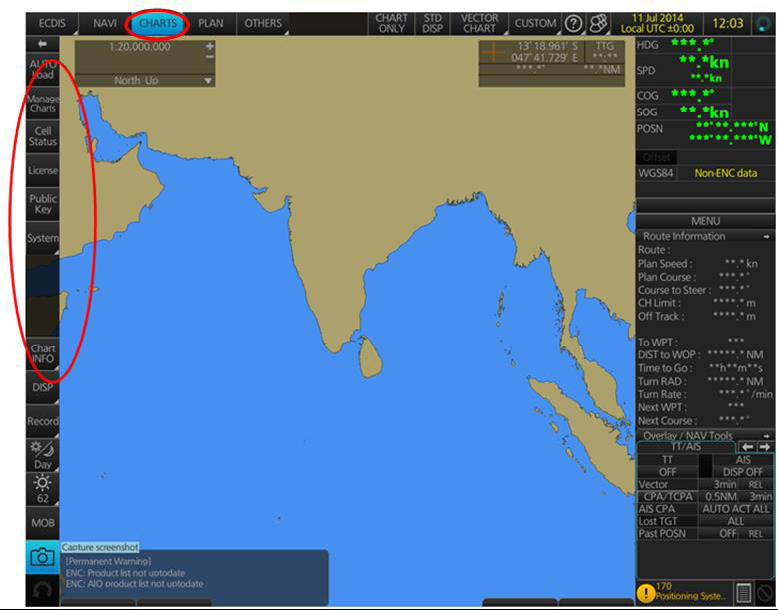
All electronic chart licensing and data management operations are carried out through the “Charts” Option on the Top Toolbar and then from the various Tabs on the left hand side of the Home screen on the FURUNO ECDIS:
To check the ECDIS Software Version: Select “?” then select “About”


To check Presentation Library (PL) Edition: Select “?” then select “About”

The User Permit Number (UPN)
The ‘User Permit Number’ is a 28 character alphanumeric string that is unique to each ECDIS installation or group of ECDIS, e.g. multiple bridge installations.
The ‘User Permit Number’ should have been supplied at the time of delivery and must be used when ordering an AVCS license.
To check the UPN select the ? → About :

The Public Key
The Admiralty Vector Chart Service currently uses the IHO.CRT, issued by the International Hydrographic Organisation, to authenticate its AVCS ENCs.
However, the Furuno 3000 ECDIS uses the IHO.PUB Public Key which is included in all AVCS Media. To view and install the IHO Public Key:
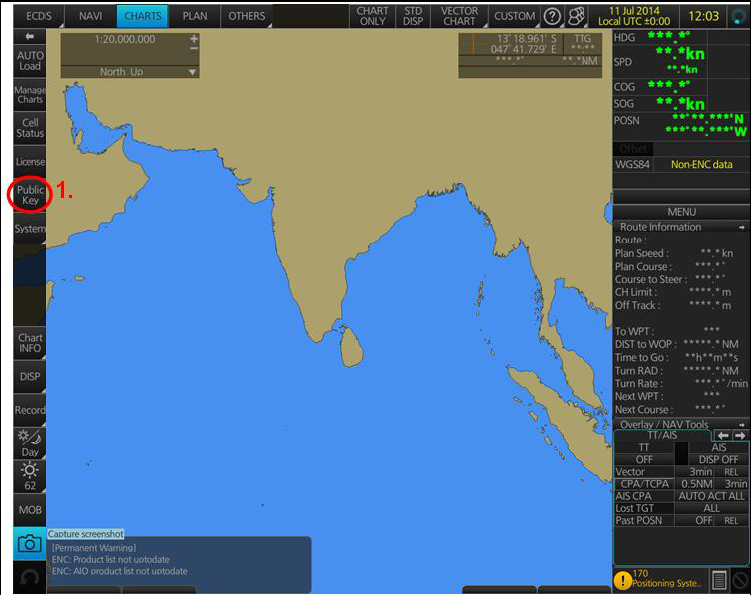
- Select ‘Public Key’ Menu on the Home screen

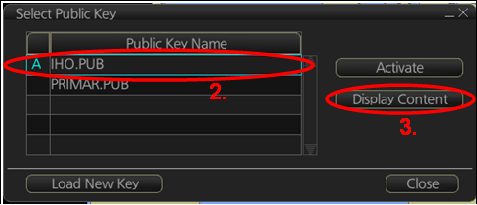
- In the ‘Select Public Key’ window appearing, when a Public Key is already activated, an ‘A’ populates the box next to the
selected Public Key - Click on ‘Display Content’ to view the already activated Public Key
If the Public Key currently installed differs from the IHO.CRT the user will need to install the IHO.CRT.
To do this insert any AVCS S63 1.1 Base or Update CD into your ECDIS and follow the steps below:
1. Select ‘Public Key’ Menu on the Home screen
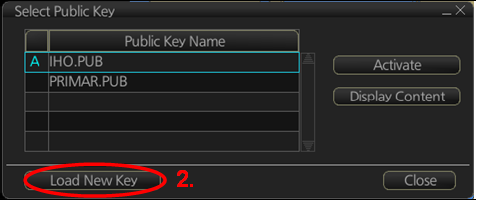
- In the ‘Select Public Key’ window appearing, click on ‘Load New Key’ to install a new Public Key
On the next ‘Open File’ window, select the location where the new Public Key to install is stored (i.e. CD, DVD, USB). Select the IHO.PUB and click ‘Open’.
An ‘Attention’ message confirming the installation of the new Public Key will appear on the screen. Click ‘OK’.
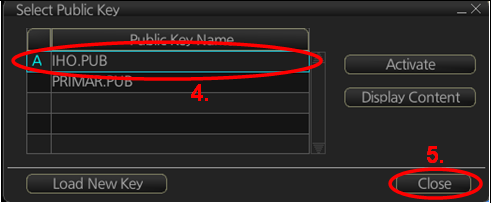
- Highlight the new Public Key and select ‘Activate’ to select the required Public Key to be installed
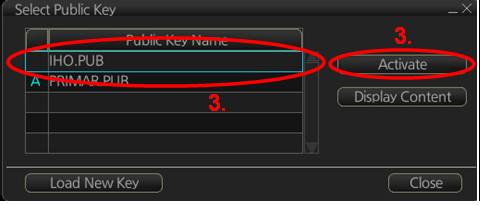
- An ‘A’ will then populate the box next to the selected Public Key.
- Click ‘Close’ to finish.
Deleting ENC Data
New AVCS customers who had previously subscribed to other ENC services are required to remove (purge) all ENC Permits and data from the system before installing AVCS.
To delete all ENCs data from the system:
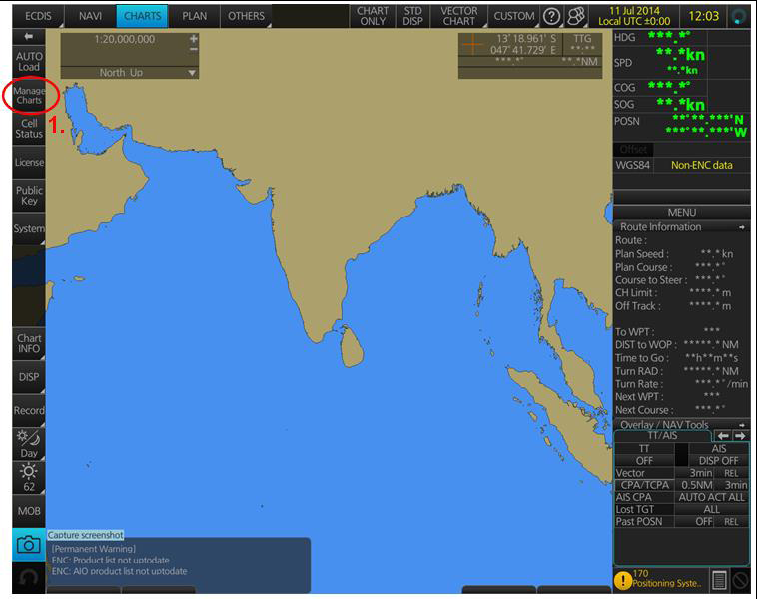
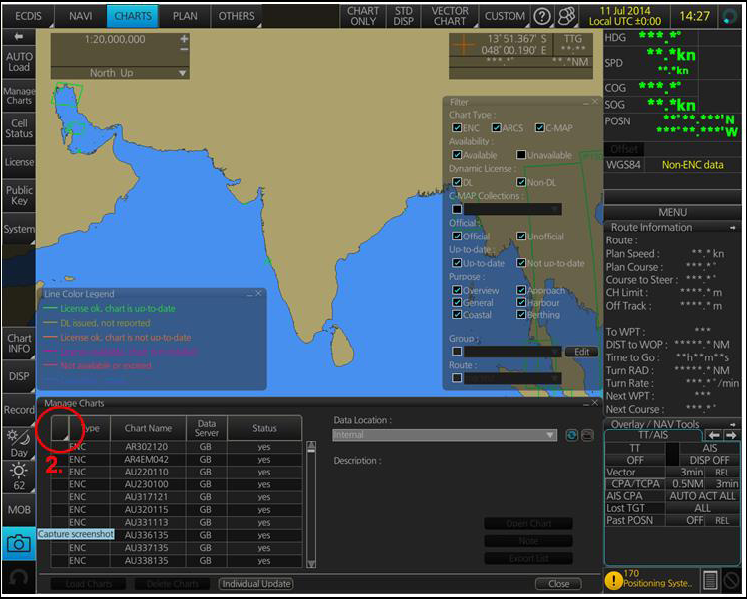
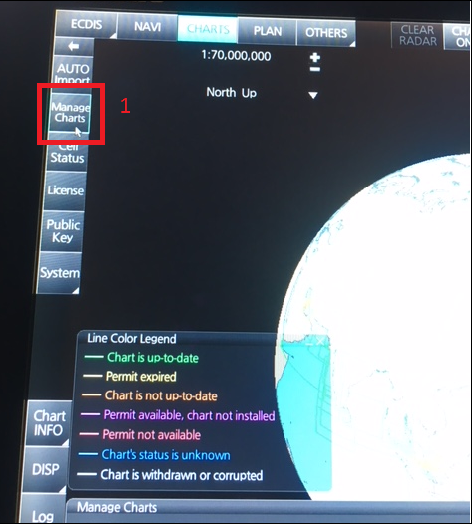
1. Select ‘Manage Charts’ on the Home screen
- In the ‘Manage Charts’ window, tick the Chart to be deleted
- Click on ‘Delete Charts’
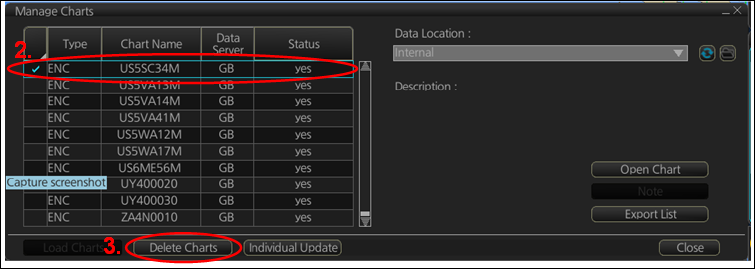
An ‘Attention’ window with the message “All selected Charts will be deleted. Do you wish to continue?” is then displayed. Click ‘OK’ to confirm the deletion of the selected Chart.
A final ‘Attention’ window then confirms the deletion. Click ‘OK’.
The deleted Chart will disappear from the ‘Licenses’ window.
Deleting ALL Charts
- Select ‘Manage Charts’ on the Home screen

- In the ‘Manage Charts’ window, right-click the block to the left of the ‘Type’ box.
- Two options then appear ‘Select All’ and ‘Deselect All’. Click on ‘Select All’.
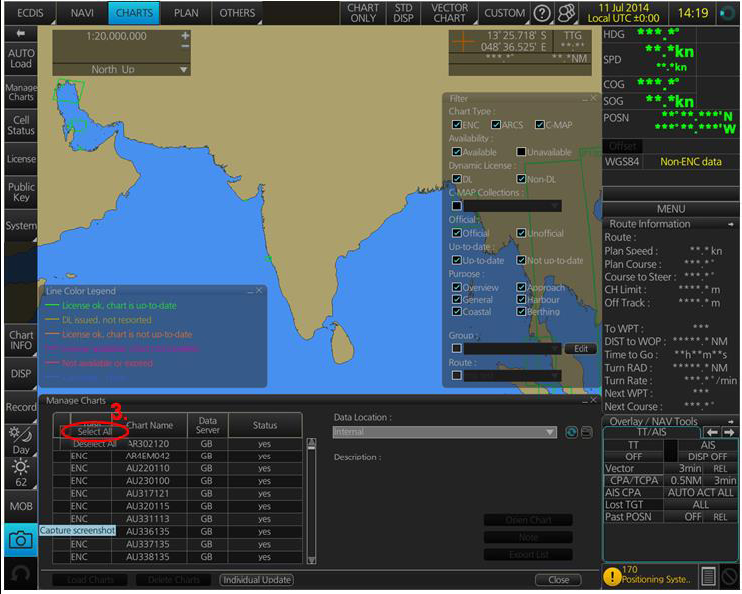
- When all Charts are selected with a Tick in front of them, click on ‘Delete Charts’
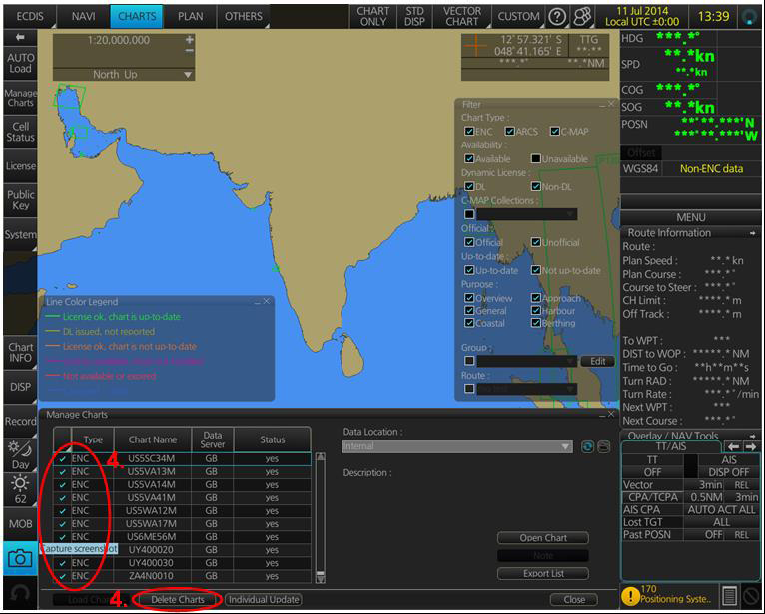
An ‘Attention’ window with the message “All selected Charts will be deleted. Do you wish to continue?” is then displayed. Click ‘OK’ to confirm the deletion of all the selected Charts.
A final ‘Attention’ window then confirms the deletion. Click ‘OK’.
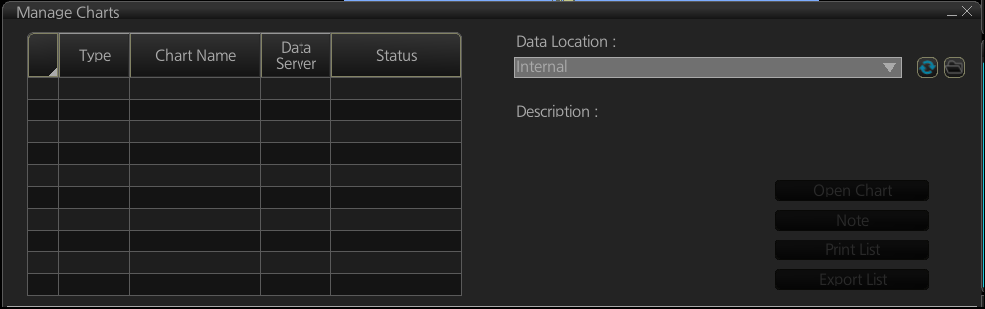
The deleted Charts will disappear from the ‘Manage Charts’ window.
Deleting ENC Permits
If the user has previously subscribed to another ENC service please remove these ENC permits from the ECDIS system before use. The user must select the cells for which permits are to be deleted. In most instances this will simply involve selecting all cells. In certain circumstances it may be required to remove permits for individual cells, in this case simply select the cells for which permits need to be deleted.
To delete ENC Permits:
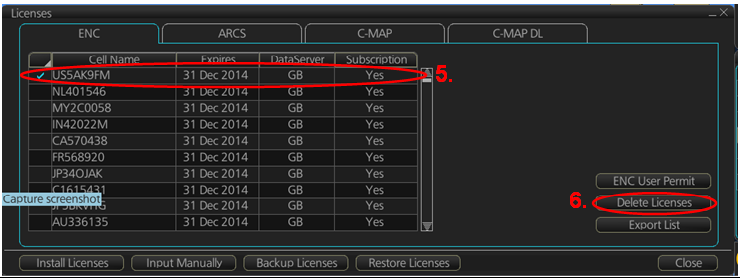
- Select ‘License’ on the Home screen

- In the ‘Licenses’ window, select the Chart for which the Permit is to be deleted, with a Tick in front of them
- Click on ‘Delete Licenses’
An ‘Attention’ window with the message ‘Selected group will be deleted. Do you wish to continue?’ is then displayed. Click ‘OK’ to confirm the deletion of all the selected Charts.
A final ‘Attention’ window then confirms the deletion: ‘1 ENC Permit removed’. Click ‘OK’.
The deleted Chart will disappear from the ‘Licenses’ window.
Deleting ALL Permits
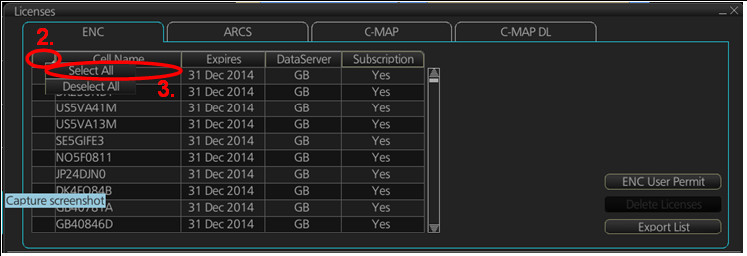
- Select ‘License’ on the Home screen

- In the ‘Licenses’ window, right-click the block to the left of the ‘Type’ box.
- 2 options then appear ‘Select All’ and ‘Deselect All’. Click on ‘Select All’.
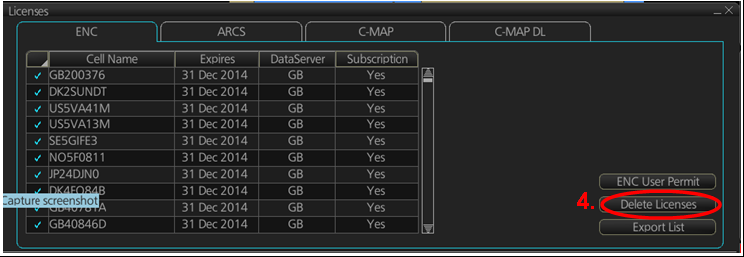
- Once all the Permits to be deleted are selected with a tick in front of them, click ‘Delete Licences’ on this ‘Licenses’ window.
An ‘Attention’ window with the message “Selected group will be deleted. Do you wish to continue?” is then displayed. Click ‘OK’ to confirm the deletion of all the selected Charts.
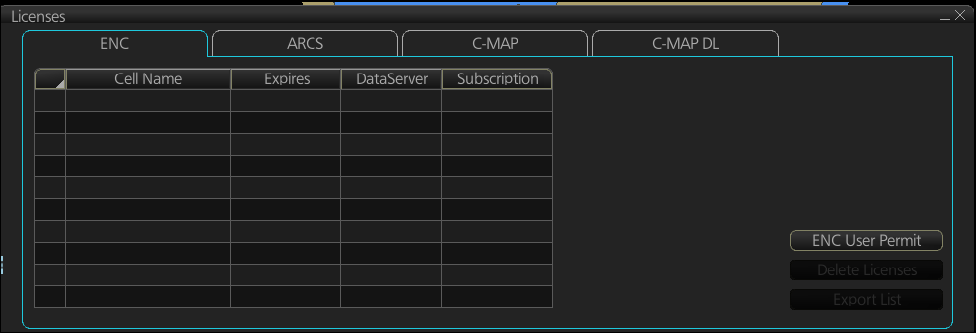
A final ‘Attention’ window then confirms the deletion: ‘XXX ENC Permits removed’. Click ‘OK’.
The deleted Charts will now disappear from the ‘Licenses’ window.
Installing ENC Permits
Note: Ensure the correct Permit is installed into the ECDIS workstation.
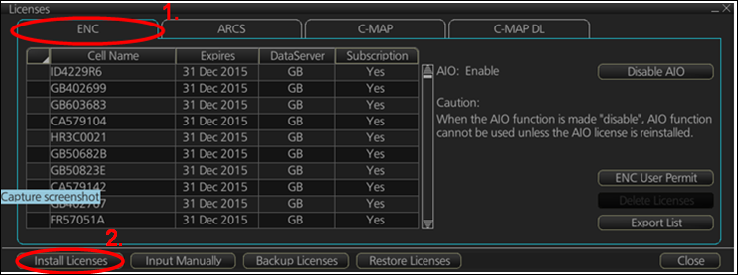
- Select ‘License’ on the Home screen and in the ‘Licenses’ window, select the ‘ENC’ Tab
- Select ‘Install Licenses’
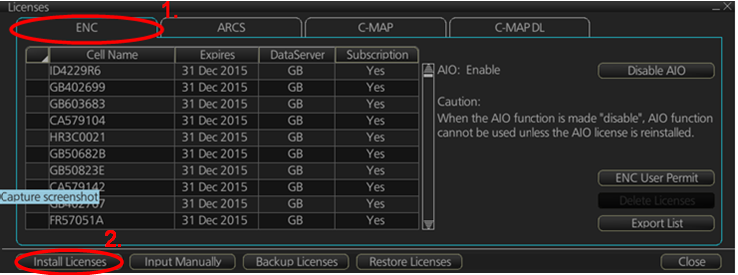
In the next ‘Select File’ window, highlight the Permit.txt file from the selected source location (i.e. USB), click ‘Open’ and then ‘OK’
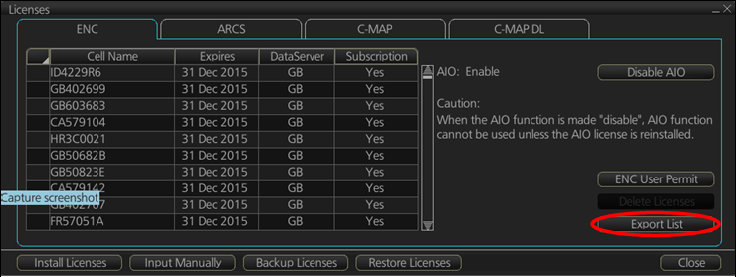
If needed, the Permit List can then be exported to external Media (i.e. CD, DVD, USB) by clicking on the ‘Export List’ option:
Installing AVCS DVDs
There are currently 2 AVCS DVD Media. AVCS DVD Media contain all the latest Base and Update data. It is likely that users will need to install both DVDs in order to load all licensed ENCs. Reference to the Schedule A can avoid the unnecessary loading of both DVDs and save the user time.
The process described here should be used in almost all circumstances as it will automatically select data to be loaded according to the permit file installed by the user.
To install AVCS DVD Media:
Note: Ensure the latest permits have been installed before attempting to install any data
1. Click on ‘Auto Load’ on the Home screen
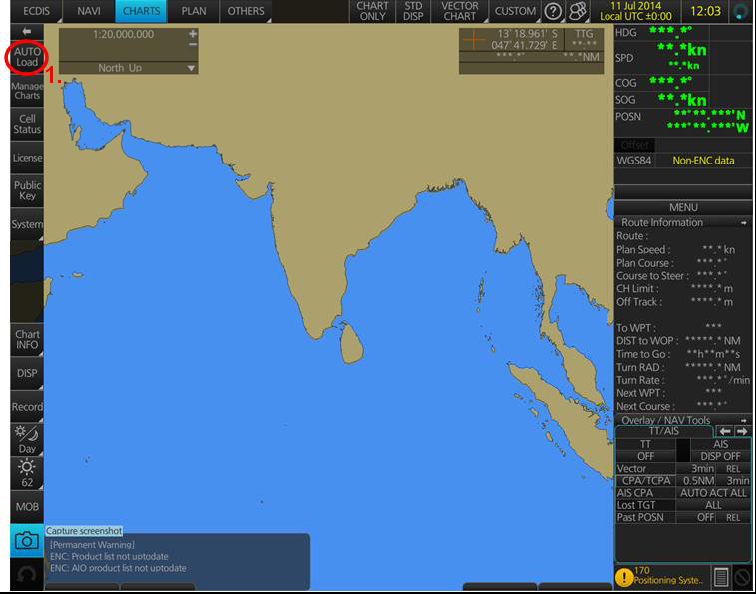
An ‘Attention’ window then appears warning that ‘this process takes time to complete and the operation speed of the system will decline. Do you wish to continue?’. Click ‘OK’.
Another ‘Attention’ window confirms how many ‘Charts are contained in the inserted AVCS Media and how many can be installed (based on the previously installed Permit file). Do you wish to continue?’. Click ‘OK’.
Note: Whenever Charts are cancelled, they will automatically be removed from the system. When this happens, this will be communicated in the ‘Error/Warning Guidance’ window at the end of the installation.
The AVCS Media will be read and a progress Bar will display on the ‘Install Chart Data’ window on the screen. When the installation is complete, a window confirming the installation will appear, click ‘Confirm’
(this window can take some time to appear even if the Progress Bar shows a completion rate of 100%)
To check the details of the data installation, click on ‘Show Details’ on the ‘Install Chart Data’ window.
Click ‘Finish’ to close.
Installing AVCS Base CDs
There are currently 9 AVCS Base CDs but this number will grow as more ENCs become available for distribution within AVCS. It is unlikely that users will need to install all of the CDs in order to load all licensed ENCs. Reference to the Schedule A can avoid the unnecessary loading of some CDs and save the user time. The process described here should be used in almost all circumstances as it will automatically select data to be loaded according to the permit file installed by the user.
To install AVCS Base CD:
Note: Ensure the latest permits have been installed before attempting to install any data
1. After having inserted the first AVCS Base CD identified in the Schedule A into the appropriate drive (i.e. D/Q), click on
‘Auto Load’ on the Home screen

An ‘Attention’ window then appears warning that ‘this process takes time to complete and the operation speed of the system will decline. Do you wish to continue?’. Click ‘OK’.
Another ‘Attention’ window confirms how many ‘Charts are contained in the inserted AVCS Media and how many can be installed (based on the previously installed Permit file). Do you wish to continue?’. Click ‘OK’.
Note: Whenever Charts are cancelled, they will automatically be removed from the system. When this happens, this will be communicated in the ‘Error/Warning Guidance’ window at the end of the installation.
Installing AVCS Update CD
Note: The AVCS update disc will indicate which Base disc week must have been installed. It is important that users do not attempt to load an Update CD that is not consistent with the Base CDs
To install AVCS Update CD:
Note: Check the AVCS Update CD for the required Base CDs to be applied first.
1. Click on ‘Auto Load’ on the Home screen

An ‘Attention’ window then appears warning that ‘this process takes time to complete and the operation speed of the system will decline. Do you wish to continue?’. Click ‘OK’.
Another ‘Attention’ window confirms how many ‘Charts are contained in the inserted AVCS Media and how many can be updated (based on the previously installed Permit file). Do you wish to continue?’. Click ‘OK’.
Note: Whenever Charts are cancelled, they will automatically be removed from the system. When this happens, this will be communicated in the ‘Error/Warning Guidance’ window at the end of the installation.
The AVCS Media will be read and a progress Bar will display on the ‘Install Chart Data’ window on the screen. When the installation is complete, a window confirming the installation will appear, click ‘Confirm’
(this window can take some time to appear even if the Progress Bar shows a completion rate of 100%)
To check the details of the data installation, click on ‘Show Details’ on the ‘Install Chart Data’ window.
Click ‘Finish’ to close.
Note: Repeat this step if directed to do so by the ECDIS.
Installing Exchange Set using USB Stick
The exchange set contained the latest Notices to Mariners’ corrections, New Editions and New Charts issued since the last update for their AVCS holdings. The exchange set can be downloaded using online chart updating software.
To install AVCS/AIO Exchange Set using USB Stick:
Note: Please do not save the Permit file within the ENC/AIO Exchange Set.
Note: The AVCS update disc will indicate which Base disc week must have been installed. It is important that users do not attempt to load an Update CD that is not consistent with the Base CDs
To install AVCS/AIO exchange set:
Note: Check the AVCS Update CD for the required Base CDs to be applied first.
To install AVCS/AIO exchange set:
- Click on ‘Auto Load’ on the Home screen ensuring there is no update media in the CD/DVD drive
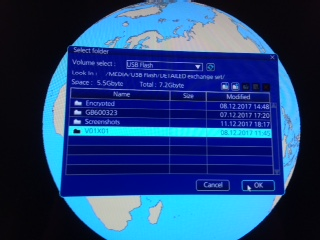
An ‘Attention’ window then appears warning that ‘this process takes time to complete and the operation speed of the system will decline. Do you wish to continue?’. Click ‘OK’. - A “Valid media not found” message box will appear. Click “Select”.
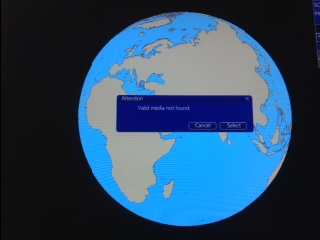
- Navigate to the exchange set on the external media, highlight the folder named “V01X01” and click “OK”.
Note: Whenever Charts are cancelled, they will automatically be removed from the system. When this happens, this will be communicated in the ‘Error/Warning Guidance’ window at the end of the installation.
The AVCS Media will be read and a progress Bar will display on the ‘Install Chart Data’ window on the screen. When the installation is complete, a window confirming the installation will appear, click ‘Confirm’
(this window can take some time to appear even if the Progress Bar shows a completion rate of 100%)
To check the details of the data installation, click on ‘Show Details’ on the ‘Install Chart Data’ window.
Click ‘Finish’ to close.
The update will then complete and any updates will be applied.
Viewing an ENC
To view ENC data:
- Select ‘Manage Charts’
- Select the ENC by ticking the box to the left of the ENC cell name.
- Select ‘Open Chart’
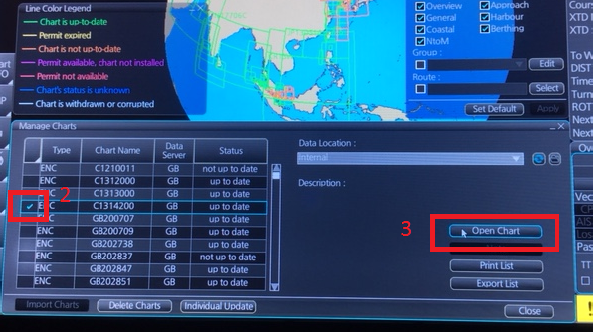
The ECDIS will then open the chart specified at the appropriate display scale.
Installing AIO Permits
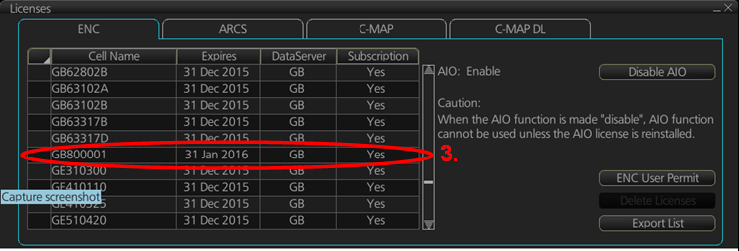
The Admiralty Information Overlay (AIO) is installed in the Furuno FMD 3000 ECDIS by installing the Cell GB800001 included in the PERMIT.TXT file and then the AIO Data.
To install the AIO Permits:
- Select ‘License’ on the Home screen and in the ‘Licenses’ window, select the ‘ENC’ Tab
- Select ‘Install Licenses’
In the next ‘Select File’ window appearing, highlight the Permit.txt file which contains the AIO Permit from the selected source location (i.e. USB), click ‘Open’ and then ‘OK’
- The AIO Permit will now appear in the Licenses List
Installing AIO Data
The AIO Media can only be installed when the usual AVCS S-63 1.1 Data has been previously installed. After having previously installed the Permit for the AIO Cell GB800001, the AIO Media now needs to be installed.
Insert the latest AIO CD into the appropriate drive (i.e. D/Q)
- Click on ‘Auto Load’ on the Home screen

An ‘Attention’ window then appears warning that ‘this process takes time to complete and the operation speed of the system will decline. Do you wish to continue?’. Click ‘OK’.
Another ‘Attention’ window confirms how many ‘Charts are contained in the inserted AIO Media and how many can be installed (based on the previously installed Permit file). Do you wish to continue?’. Click ‘OK’.
The AIO CD will be read and a progress Bar will display on the ‘Install Chart Data’ window on the screen.
When the installation is complete, a window confirming the installation will appear, click ‘Confirm’(this window can take some time to appear even if the Progress Bar shows a completion rate of 100%)
To check the details of the data installation, click on ‘Show Details’ on the ‘Install Chart Data’ window.
Click ‘Finish’ to close.
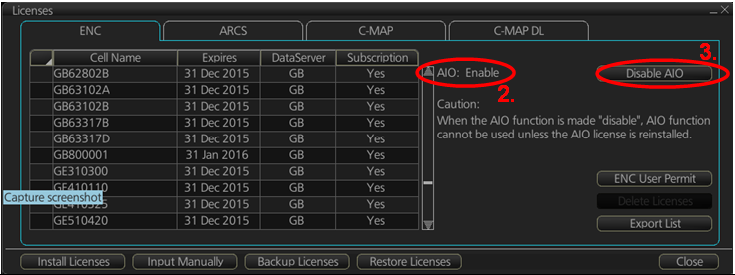
- Once the AIO Permits and Media have been installed, the AIO is enabled
- If needed, the system will give the user the option of then disabling the AIO from the ‘Licenses’ window:
Using the AIO
To enable AIO data: 1. Select ‘Display’ from left hand tool-bar.
- Select ‘Chart DISP’ option.
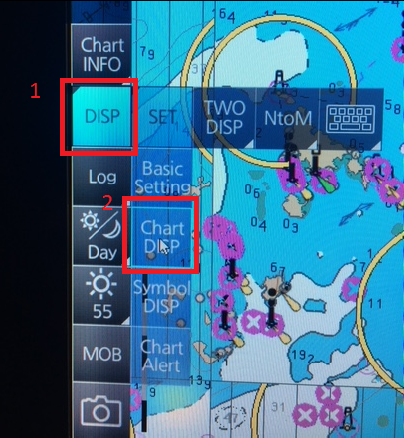
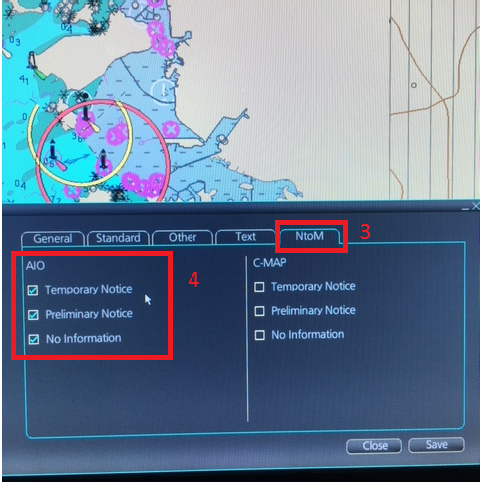
- Navigate to the ‘NtoM’ tab.
- Ensure all options under ‘AIO’ are ticked on.
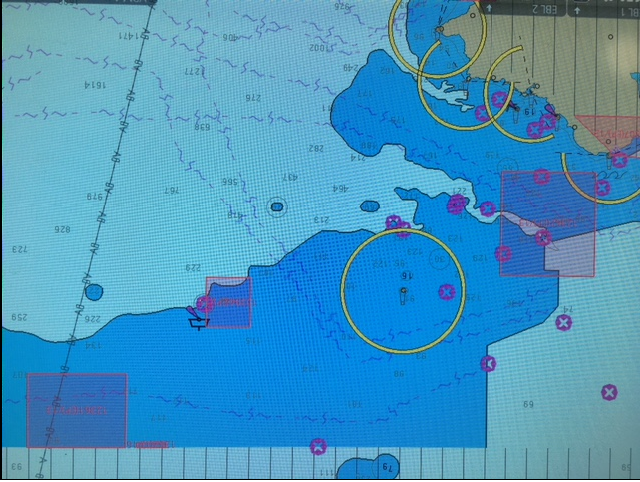
To view AIO data:
- Start by opening an ENC and you should see red polygons with the T and P number labeled over the center of them.
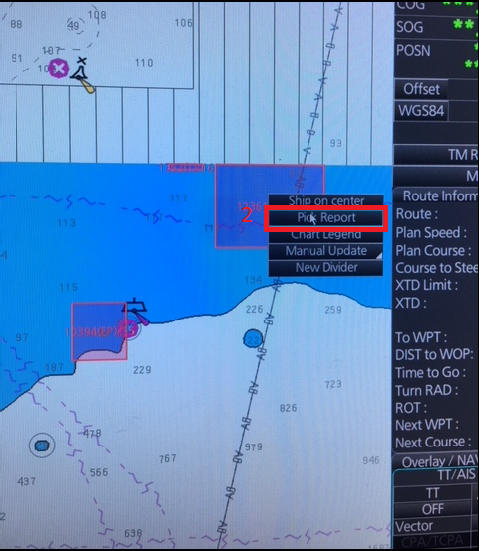
- Right click over an AIO polygon and select ‘Pick Report’.
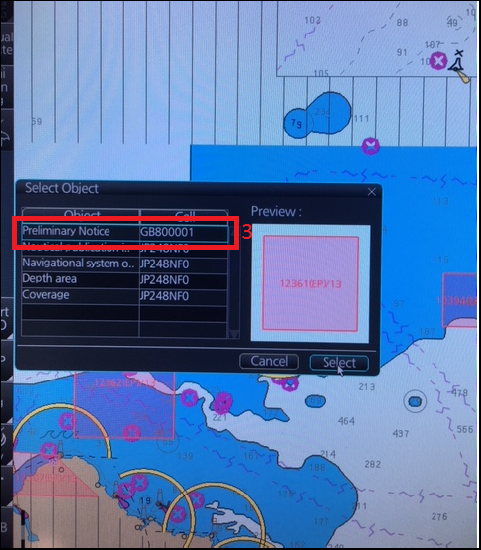
- Select the GB80001 polygon from object list and click ‘Select’ in bottom right of selection box.
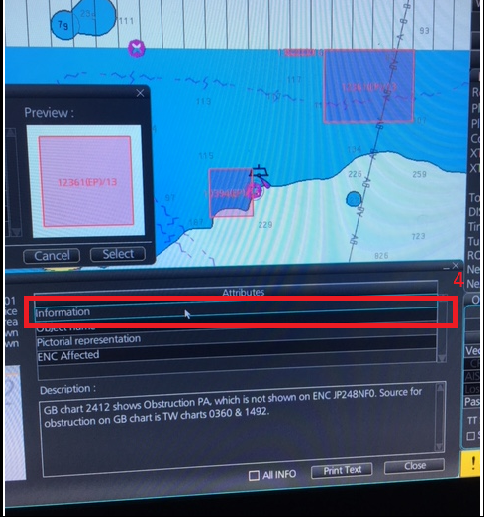
- Select the ‘Information’ box by left clicking which will give you the notice information relating to the polygon.
Systems Checks
The user has the option to review the status of all installed ENCs on the Furuno FMD 3000 ECDIS by consulting various Reports.
1.Select ‘Record’ on the Home screen
2.Select ‘Chart Log’
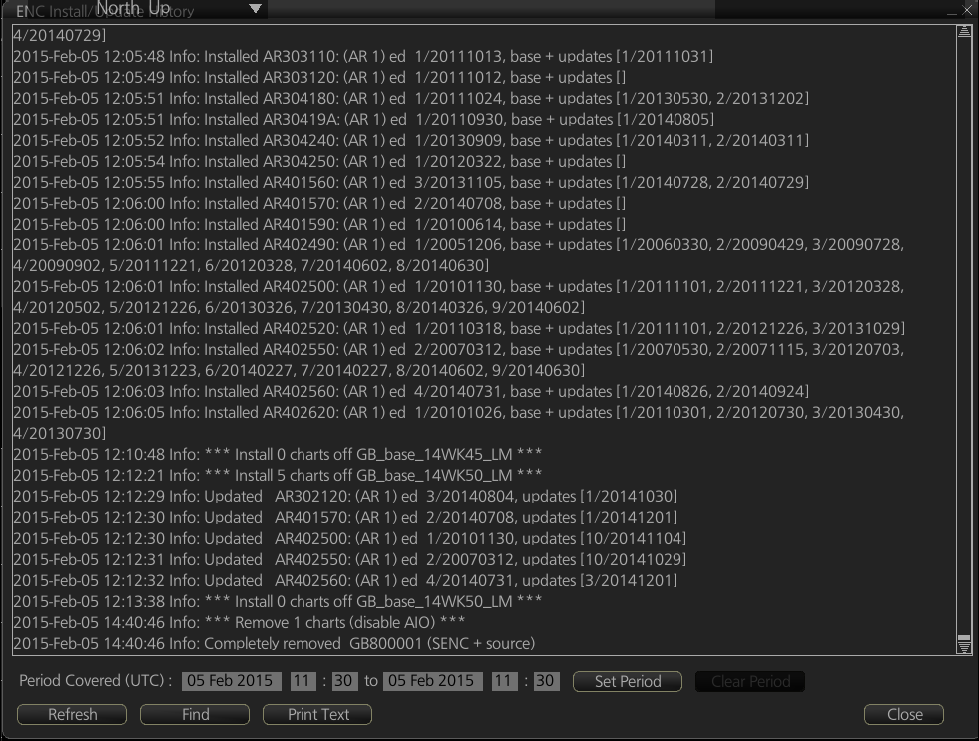
3.Select ‘ENC’
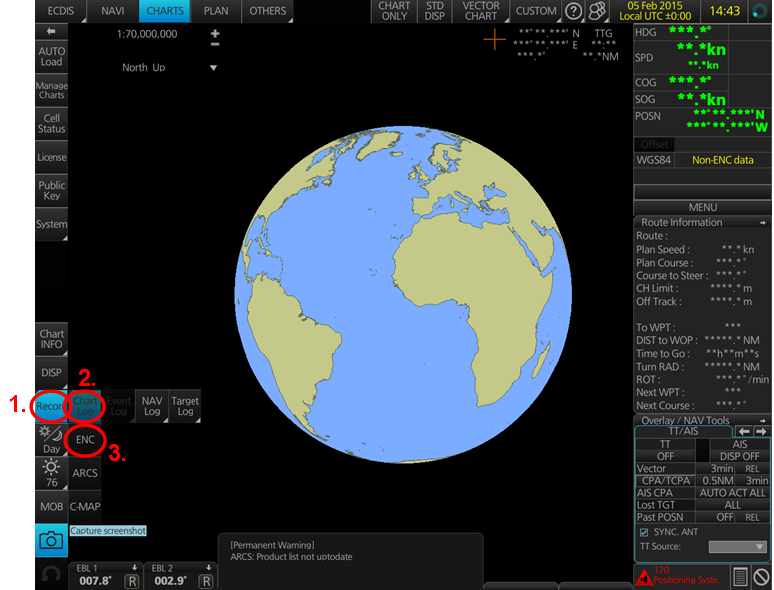
A Report containing all the installed Cells then appears on the screen. This Report contains information about all the Update status of the Cells currently installed on the system. Select ‘Close’ to close the Report.
The Furuno FMD 3000 ECDIS displays the Cell status of the Cells installed within a colour coding system on the Geographical Display:
Green: The Permit is valid and the ENC is available for use in SENC format. If the source of the ENC is a RENC, then the ENC is also up-to-date. If the source of the S-57 vector chart is something other than a RENC then all loaded updates are included into the SENC.
Orange: You have a valid Permit and the ENC is available for use in SENC format but it is either not up-to-date or has been cancelled. This could be for several reasons, either the SENC is from a previous edition, the latest SENC update was missed or the ENC has been cancelled.
Red: If an ENC is installed in the SENC but does not have a corresponding permit installed then the ENC is no longer available for display in the viewer.
Blue: The conversion of the Cells from RENC to SENC as somehow failed during the conversion process. This can be due to a software upgrade or an issue with the data itself preventing the Furuno from successfully converting to SENC. For example, one Cell was up-to-date before a software upgrade and was not updated when the software was upgraded. Then the Cell would show as blue until the conversion process is completed. Contrary to the Magenta colour which means that the RENC to SENC conversion was not even started.
Magenta: You have a permit to use the ENC, but the installed ENC is not available in SENC format and thus you cannot use the ENC currently.
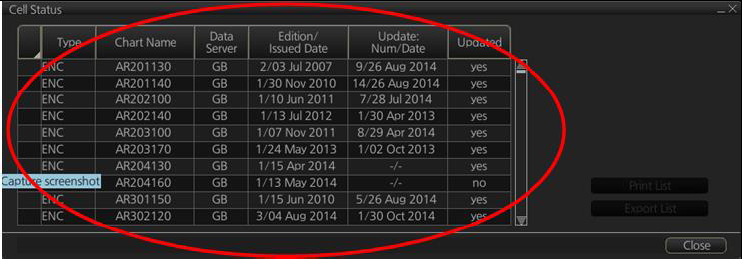
It is also possible to check the updating status of all Cells installed within the Cell Status mode:
1.Select ‘Cell Status’ on the Home screen

2.The ‘Cell Status’ window then appears displaying the Updating status of all Cells installed:
If screenshots need to be taken (i.e. report specific issues), this is carried out in the Furuno FMD 3000 by clicking on ‘Capture Screenshot’ on the Home screen.

When the required screenshot is taken, it will be automatically saved on the system within the ‘Settings’ Tab on the top Menu
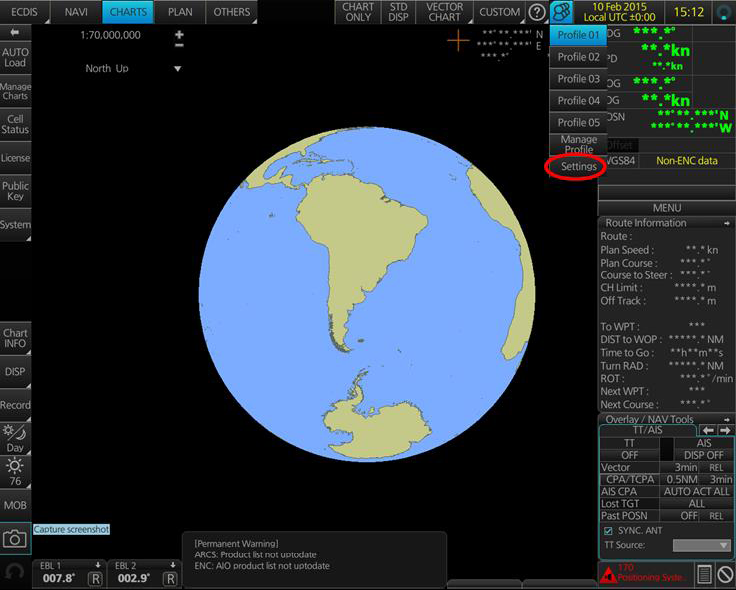
In the next ‘Settings’ window, find the screenshot previously taken (usually at the bottom of the drop down list), highlight it with a tick on its left hand side and then click on ‘Export’. This will open a new window where you can then save this screenshot on the preferred source location (i.e. USB).